Showing posts with label vegetables. Show all posts

Sunday, January 2, 2011

Saag Again


I make a lot of saag, and so it's not really necessary for me to re-post the recipe I don't think. I'll just explain that this time I quadrupled the recipe, added some grated asoefetida for digestion, mustard seeds to make it more South Indian than North, (and also digestion), skipped the green chili, and this is a photo (above) of how much spinach was involved.

Normally I use frozen spinach because you don't need to slice it up and wash it well (the annoying parts of spinach prep), but Newfoundland ran out of frozen spinach in the lead-up to Christmas. I doubt it was because Newfoundlanders went out and bought it up. Somehow I think that it's just not that popular a frozen food. I mean, you don't boil it up with Jiggs Dinner of peas pudding, so what are you supposed to do with it?

This. This is what you're supposed to do with it. Mustard seedy, asafoetida-laced gloop. I love it.

Saturday, November 20, 2010

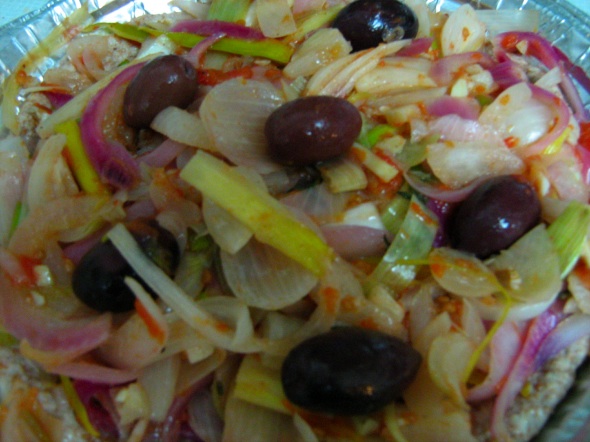
Pissaladière: "A la di Stadio"

This wasn't your fault, Josée.

If I could only follow a recipe properly this would have been fine, delicious even, but you asked for 2 lbs of onions and I only had 1 and a pound of leeks. And apparently leeks take a whole lot longer to soften than I thought, even when they look ready for the next step. I didn't even try one to make sure. Ultimate mistake. Honestly, I had to do was not under-cook them and this is the easiest recipe in the world. My canned (home-canned, so they taste like summer, not factory) couldn't even save this pissaladière.

So for anyone else who aspires to di Stasio greatness, here's how to make this dish properly:

1 tbsp olive oil heated over medium heat
2 pounds onions (you can use leeks but they MUST be softened to an onion-like consistency), cut in slivers
4 tomatoes, peeled, seeded and chopped
Some thyme
1 glove of garlic, finely chopped
salt and pepper

Add the leeks to the hot oil and cook about 5 minutes, then add the rest of the onions since I think they'll cook faster. Cook, and cook, and cook, and then when you think they're done, TASTE them, for the love of God taste them. If you have to chew and crunch they're not done. 20 minutes minimum. Just suck it up and wait. If the leeks and onions start to burn turn down the heat or add a tiny, tiny bit of water. You don't want to steam the onions and leeks, but better slightly steamed than slightly burned. You can also use 2 tbsp at the beginning instead of one if you must, OR do this in 2 batches because I think another potential downfall of my own was that the pan was not big enough. I'm thinking ENORMOUS frying pan next time.

Finally, when you can't wait any longer and the leeks are edible add the 4 seeded, peeled and chopped tomatoes, some fresh thyme or some dried (a small sprinkle, a big sprinkle, as you wish), some minced garlic (about 1 clove), and salt and pepper. Cook 5 minutes more. There shouldn't be a lot of liquid from the tomatoes, but you also don't need to drain them or anything. The juice will help deglaze the leeks and onions.

Preheat the oven to 350 Fahrenheit.

Now pour the whole thing on top of pizza dough or a flatbread dough (pita bread works too. I had a roti that I stretched out to pizza-like thinness. At least that worked...well...). Don't forget to oil the dish before you put the pizza dough/bread dough in or you'll never get to eat that dough. Mine got stuck and I scraped and I scraped and it never got eaten. Such a waste.

Into the oven for 25 minutes, or until you figure it's done and the sides of the dough haven't burned. You can also brush the top of the leek/onion mixture with olive oil so it browns a little, but that only helps if you didn't mess up the onion frying. Such a novice mistake. Optionally top with anchovies, olives or red pepper strips (preferably roasted, though the 25 minutes will go a long way toward roasting them) before popping in the oven. The salt from the olives collapses into the leeks, so at least it's properly seasoned.

I'm such a bad Quebecer. Messing up pissaladière...

Sunday, October 31, 2010

A Peck of Pickled Peppers Not Picked By Peter


I'm not sure if that's actually what I meant to write or if it's just tactile stuttering because I can barely feel my fingers...

It was a long bike ride from Jean-Talon this morning and the Tunisian dates and the bison rib didn't keep me warm from the inside out as I'd hoped. I did the same thing last Sunday minus the rib but it really didn't seem as cold then. Last week I loaded my bike up with a mix of red and green peppers and planned to do some standard pickling. So far my pickling has been a bit exotic for a newbie (fig jam, cayenne peppers, green gage plum and vanilla jam, daikon radish threads with Sichuan peppercorns) so I decided to step back and try a basic recipe for pickled peppers. Now I'm sure they weren't already pickled when Peter Piper picked them. In fact he probably brought them home to his mother or wife to pickle them, but he put the effort in. My equivalent effort was getting the pickles home from the market. Not one spilled (unlike my heart-breaking blueberries) but I had no wife or mother at home to pickle them for me. I'll think about working on that.

Pickled Peppers
8 green peppers. sliced
8 red peppers, sliced
8 medium onions, roughly diced
2 cups white vinegar
2 cups sugar
2 tsp salt

In the end I don't think I like this recipe because in all the blanching and boiling the peppers lose their colour, which means they lose a lot of their nutrients, and that's kind of the whole point of canning - to preserve things such as nutrients. Still, it was the best recipe I could find, having not looked particularly hard in three recipe books and not trusting the internet.

Let it be known, I did this all correctly:

1. Wash your jars, lids and canning rings in hot soapy water and put the jars and rings in a big stock pot or canning pot. Bring the pot to a boil and boil for 20 minutes. After 20 minutes, just leave the jars and rings in the water but turn off the heat.

2. Combine the peppers, onions and 1 1/2 cups of boiling water in a large saucepan. Cover the pan and let it stand for 5 minutes. Drain.

3. Return the vegetables to the saucepan. Stir in 2/3 cup vinegar and 2/3 cup water. Bring to a boil, reduce heat, and simmer for 5 minutes.

4. Drain the vegetables again and put them back in the saucepan. Cry a little as all those nutritious things circle down the drain. Dream of summer when all this canning nonsense isn't necessary.

5. In a small saucepan, bring a cup of water to a boil, then turn off the heat and add the jar lids. You don't want to boil them and wreck the wax seal. 

6. Heat the remaining 1 1/3 vinegar, the sugar and the salt in a microwavable bowl or cup (or on the stove in a saucepan, but that makes your stove pretty busy). Add the mixture to the vegetables and again boil the heck out of the previously brightly coloured peppers. Okay, well boil them gently for about 25 minutes, until they're tender-crisp.

7. Carefully take the jars out of the sterilizing water (for some method suggestions, check here) and place on a clean cloth next to the pepper pot.

8. Fill the jars with peppers, onions, and brine up to a 1/2 inch from the rim of the jars. Use a chopstick or spatula to push down to get any air bubbles out, and then wipe the rims down with a clean cloth or paper towel.  Carefully place the lids on top, then the tightening rings (no hands, please). You can tighten the rings by hand, though. Not too, too tight. Not superman tight. Just "little old lady" tight. Harness your inner little old lady. Do not:

1. Swear when you drop a lid
2. Cry when you see that's it's snowing
3. Give up. Never give up.

Then stick the jars back in the still hot sterilizing water (they shouldn't touch the sides or bottom of the pot, so put down a kitchen cloth in the bottom or form some kind of rack. Anyone want to patent a circular canning rack with me? Bring to a boil, and start the timer for 10 minutes (for half pints) or 20 minutes (for full pints) once the water comes to a boil again. Remove the jars again to a clean cloth, turn them upside down (not really necessary apparently, but it's comforting when they pop. Somehow makes botulism less scary) and let them cool. Label them. Now you're allowed to cry.

Hey, at least you have pickled peppers.

Tuesday, October 26, 2010

One Love Fennel: Roasted Pasta Sauce or Ragout


I went to my fruit guy in Jean-Talon, Leopoldo. He doesn't do local. Neither did he have ataulfo mangoes (though he did the next week), and I knew the white peach and white nectarine seasons were over, so why did I go back to him? Because that's my Sunday. He makes my Sunday a happier day, what with his slightly intimidating self-assured nature that inspires trust.

And it turned out that white nectarines are back in season in California!!! I nearly died of joy.  Leopoldo said they were good, so I bought them. They were better than the Ontario ones, he said (and he was right, since I haven't had a really good Ontario one all season for some reason...you can't get the sweeter white ones from there now anyway, and I'm very picky). Unfortunately he was wrong about them being good, and my world collapsed a little, my heart tore at its tender seams, and I felt a bit spiritually lost.

Every last nectarine tasted like starch. It's true they weren't ripening properly in my frigid kitchen (1 degree celcius yesterday! That's madness) but they just turned to mush and went bad. There were a few that were almost trying to be flavourful, but they failed miserably...

But this post is not about nectarines. It's about fennel. Those too I found at Leopoldo's before I knew how crushed my heart could be by a man and his nectarines.

I have an ongoing love affair with fennel. I used to hate the anise flavour of the vegetable until I found a recipe a few years ago that said to roast it and then add a tiny, tiny bit of lemon juice and the natural sweetness of the vegetable comes out and the bitterness gets roasted away. I ate a whole fennel bulb that way and again nearly died of joy. I suppose I have a lot of near-death experiences with fruits and vegetables...

In Quebec this season the rain hasn't been right for fennel growing. I bought local, organic ones only once this summer and braised them with fibrous, wiry results (recipe #2 in my "Recipe For Disaster" cookbook?) AND they were really expensive! $3 or $3.50 for just one dwarfed heart.

But Leopoldo had a sale on. $5 for 3 of the big, juicy ones. I was sold. Even on the last organic farmers' market day of the season of Marché Fermier I chose to take up valuable granny cart space with three big bulbs of non-local fennel. That's how much I love these things.

So I decided to roast two of these guys according to my roasting bible in a recipe meant for pasta sauce, but which I would just have just with bread, and then I'd roast the third bulb according to my standard, simple roasted fennel with lemon recipe. Here's the first:

Roasted Fennel with Tomato (Pasta Sauce or Bread Topping or Sandwich Filling...or Snack)
2 bulbs fennel
1 head garlic (mmm...roasted garlic...)
1 tbsp fennel seeds (overkill, but nice)
2 tbsp olive oil
4 plum tomatoes, chopped (I used fresh green ones...bad idea! They weren't nearly sweet enough and they weren't plums, so the acidic, bitter juices got into the fennel and killed them in their over-heated sleep. You're also only supposed to end up with 2/3rds of a cup, but I had about a cup and a half of tomatoes to use up, so that's what went in...again, not a good idea. Try to cut the tomatoes evenly so they roast evenly, and again, smaller is better)
1/4 tsp. crushed red pepper flakes
kosher salt (or other) and ground black pepper to taste

Preheat the oven to 450 Fahrenheit. Cut the fennel bulbs (wash them first) through the core and into quarters. Then cut out the tough core of each. Finally slice the outer layers into 1/8" slices. It doesn't really matter how thickly you slice them. They'll just take more or less time to cook, but I find the thinner ones end up crisper and the bigger ones are more watery, so slimmer is better in this case. In a BIG baking sheet or roasting pan toss the fennel slices with everything else and spread it as thinly as possible in the pan.

Once the oven is preheated, roast the fennel for 35-45 minutes. Don't stir or turn unless it's looking as though it'll burn at any second and it's not quite done yet. Voila dinner.

If you want to make this into pasta sauce, cook some pasta, drain it and return it to the pot. Add the roasted mixture, scraping in all the delicious blackened bits. Add about 2 more tablespoons of olive oil, then tear a cup of fresh basil leaves from their stems and add those. To serve, toss in a little mozzarella or parmiggiano reggiano (please, please, please do not use pre-powdered "parmesan" cheese. You'll break my heart more than the nectarines and Leopoldo did).

You know, I was expecting the fennel to make up for the lacklustre nectarines, but again, I was a little disappointed. I mean, they weren't bad, but I think I cut them too thickly and they ended up too watery. I also think my tomatoes were too juicy (and I used too many), but really the fennel flavour should have still been strong and dreamy, and I should have fallen in love with the aroma from my kitchen. In and out, in and out...I know, it's a bad cycle.

Alas, food is fickle and my heart is not a plaything. I also feel as though maybe I deserved this for buying so much imported fruit and vegetables. Surely the flavour just couldn't be as good as what I could get organic and local. Maybe I'm the fickle one, since the next day I fell in love with eggplant all over again. Well, to be fair, I fell in love with eggplant in sesame oil, so I mostly fell in love with a quarter cup of sesame oil. That sponge-y local, organic eggplant just soaked it all up and caressed my broken heart (and stomach).

Thursday, October 14, 2010

Oven-Dried Tomatoes

So I figured I'd missed the Montreal "sun-drying" opportunity. Fortunately I've been dehydrating like mad and feel very comfortable with my oven door slightly ajar.

When I bought expensive tomatoes from my farmer John to make sauce he told me not to make. He said they're too expensive for sauce. No, no, trust me, I said. In the end it was the best sauce ever. I figured the same tomatoes would make incredible dehydrated (oven-dried) tomatoes. The normal sundried tomatoes you find in stores often have sulfites added for colour or preservation, so if you don't dry your own (who does that anyway?) check the label.

This is actually really easy. Pictured above is how to do it very poorly with a lot more maintenance. What you need is a cake rack placed on a baking sheet. I just used a baking sheet brushed with olive oil. I did not have my Atwater Library membership or my three loaned books on preserving at the time. Had I known...

Anyway, slice Italian tomatoes (the sauce tomatoes that already have less juice, not field or beefsteak or heirloom or cherries - though you could get away with cherries and they'd be sweet...hmm...) in half and place cut side down on the cake rack or something that elevates the tomatoes and lets air pass underneath. This will dry the tomatoes in half the amount of time otherwise required. You can brush the tomatoes on both sides with olive oil if you like, but I'm sure this doesn't expedite the drying process.

Then stick them in the oven at the lowest possible temperature with the door a little open. And wait...

And wait...

And wait...

And then...
If you didn't elevate them you might need to turn them over a few times in the process, though having them skin-side up doesn't really help the liquid evaporate out. I used bigger tomatoes that had two cut sides, so there was more juice but also more turning required. Basically it required a day and a bit of turning to dry these guys out when overnight should have sufficed. I was scared to under-dry them because then they'd go moldy and all would be for naught - those precious tomatoes reduced to barely nothing as it was. I'm stocked for winter. So much pasta sauce...

Tuesday, October 12, 2010

"Raw" Zucchini Noodle Pasta With Sun-Dried Tomato Spinach Cashew Sauce

I wanted to make zucchini noodles. It's basically impossible to find Quebec organic zucchini now. The season is over. If you see them it's unnatural, and it reminds me of strawberries in December (not jam), but I bought them anyway because I wanted to make zucchini noodles, and I figured that in the winter I'm going to buy zucchini one way or the other, and it definitely won't be local organics then either. Horrible reasoning, I know, but there you have it. Welcome to my head.

I have a slicer thing that I inherited from a former apartment. I used it for my daikon radish threads (amazing by the way. So much better than raw radish. The salt and vinegar cut right through the stomach-turning quality of it and made it something almost sweet)...and then the crank went missing. I have a feeling I threw it out...forgetting what it was for, thinking it was some leftover junk in a wild purge of apartment things. 'Wild' being a relative term - it's not as though I turn into a savage when I clean my apartment . I probably thought about it hard for maybe 5 minutes and weighed my options for a machine-less crank before deciding it was useless and throwing it out. Idiot...

The point is my blade doesn't work anymore. I tried using a bobby pin to replace the crank that keeps the machine together, but that didn't work. I tried a chopstick but that didn't work. Then I decided to just grate the zucchini. It's not the same. In fact, it sucks. All the liquid comes out of the zucchini and you end up with watery "pasta". I mean it's bad enough it's not real pasta, but it's worse that it tastes like chewy strands of watery mush.
Anyway, I had some green zucchini and some yellow and I threw in some red pepper for colour, so at least it looked beautiful.

Really the dish was all about the sauce anyway, which was wonderful. Raw food gets a bad rap, but that's mostly because you find some bad recipes. When you find a good recipe, keep it, use it, and appreciate it.


"Raw" Spinach Cashew Sauce (or spread, or dip...)
Here's the recipe from one of my favourite raw websites, Rawmazing. It's very lemony, this sauce, but that's good because you want something to cut through the mild sweetness of the cashews. I hate using raw shallots and garlic, but it does taste really good. You could also sauté the onions and garlic in the olive oil first, and then add them to the purée if you're not actually a raw foodist. I didn't out of laziness, not out of dogma. The nice thing about raw food is you throw a bunch of things in the blender and don't use a million dishes, pots and pans. The downside is it's all baby food...

...purées and chewy dips. It's a nice, healthy change, but, well, I couldn't do it all the time. On the upside, I feel really strong the days I eat this way (even one meal a day of it, as long as the other meals in the day aren't really starchy or refined sugar-y). I don't get the "raw food high" or "glow" that I see on people who do it all the time, but I'm quite convinced that in a fight I could take them. Well, me and my animal protein could take them, maybe even especially on the days I eat raw, though, if that makes any sense...it's kind of like cross-training, raw food...you do it sometimes and it makes you stronger. Then you do other things other days, and together you're better off.

Anyway, for the pasta sauce I didn't add any extra salt (you put the nut spread into the pasta sauce recipe below on the website) and I didn't have enough sun-dried tomatoes to add a whole cup, but I had maybe a quarter cup and that worked just fine. I'm currently oven-drying my own, so I'll have lots for next time. Hard to get the sun to do that for you this time of year in Montreal...

Anyway, I was very happy with this dish and ate it with more zucchini pasta for the next three days, because that's how long it keeps. The cashews keep fermenting a little in the liquid if you store it in the fridge (or freezer), so either you're going to be eating a lot of nuts or you're going to be throwing some out or sharing (God forbid). Just remember that it can be a good dip or quiche filling as well, and don't let that limit you because I think it's the perfect sandwich spread too. Mmm...lemon. Succo di limone at the Fromagerie Atwater (pure, imported lemon juice, much better than the organic lemons from California, and I would never use non-organic since they're from the same place and are just worse, and I'm a lemon snob). Sorry, carbon footprint.

Thursday, October 7, 2010

The Triumphant Return of the "Free Gazette" Man!

"Have a Gazette! Wipe your windows!"

I smiled. He was back...

"Make fire!"

...and in fine form, it seemed,

which reminds me that it's Hallowe'en, which in turn means that I should be canning every last fruit and vegetable that I can get my hands on before Montreal goes sub-zero. Red and green tomatoes? Check. Chili peppers? Check. Fig, vanilla bean, and amaretto jam? Well, I meant to, but then I ate all the figs. Oops. 

Canned Tomatoes
Here are better instructions than I could ever give, with better pictures than I am currently capable of taking. This blog, Food In Jars, was suggested to me at the Concordia Sustainability Fair by "two canning wizardesses" who have not called me to can, as they said they would. I am only slightly disappointed. I managed on my own. Women are fickle, it seems. To be honest, if they called me tomorrow I'd still can with them. Does that make me sound desperate?

Anyway, the recipe is clear and simple. My only suggestion is that you really only need to blanch the tomatoes for one minute at most, as long as they're fully immersed in the water (ou may need to turn them over at the 30 second mark to ensure even blanching. Use tongs, not your fingers). 2 minutes of blanching and they start to cook, which really isn't a bad thing, but in general, the less-cooked the better. You're probably going to cook them in whatever recipe you use them for anyway, so save as much freshness now as you can. 

I used a mix of red and green tomatoes, mostly for aesthetics. The jars look cool (see the little bits of green in some of the jars?). The green tomatoes are a little more watery, though, so consider breaking them apart a little and draining them through a fine mesh sieve after blanching before stuffing them in the jars. The greens and are also a little more sour, so you may need to adjust for sweetness in whatever recipe you end up making. Make sure you process for 85 minutes after stuffing and safely sealing the cans. The lemon juice thing takes a little bit of calculation, but whip out that pencil and paper and remember how to cross multiply and you'll be fine. x = ?

It's genetic, I'm sorry.

Sunday, September 5, 2010

Zucchini and Tomatillos Cooked In Chilies

I'm a big believer in using what you have. What I had was a pot in which I'd just made the most delicious chile sauce. The pot still held the remnants of the sauce and I hate wasting a delicious thing. I wanted every last bit of heat. So I quickly chopped some zucchini and diced some tomatillos. I figured the zucchini might be weird but the tangy sweetness of the tomatillos would be amazing. In general I think spicy fruit is highly underrated. Think Thai mango and papaya salads. They are heavenly. Sweet and spicy go together. If you can add sour and salty to that then all the better, and there was a little salt in the chili sauce and a little natural sourness in the tomatillos. Perfect.
So I deglazed the pot with a half cup of water and lightly boiled the tomatillos and zucchini. Then they became both a hamburger condiment and a salad ingredient. The salad needed a little more sour from some vinegar, as well as some oil to mute the heat, but it worked. It worked better on the hamburger though, because it was pretty pungent...

What's wrong with Toronto? Do they not believe in good tomatoes? I went to St. Lawrence market, my mecca of beautiful food, and bought a very inexpensive container of tomatillos. I figured they'd be just as good as the ones I'd been having in Quebec. Nope. They were junk. They were sour and either too soft or too hard, picked too early from the branches. I roasted them and they never got sweeter. The complexity of taste I'd come to expect was lacking. I wasted $2.00 that I'll never get back, but more importantly my respect for this little shop in St. Lawrence market that carries my favourite Pinehedge yogurt and kefirs, Niagara Foods, is much less.

Anyway, if you don't want to make the chile sauce recipe you can still recreate this effect for the purposes of creating a great hamburger condiment (much better than ketchup and pickles) by boiling a little water with a sprinkle of salt, sugar, a dash of vinegar and some crushed chilies or cayenne or other chile powder to taste. If it doesn't work out, though, don't blame me. Blame the chile powder. Then add some sliced zucchini and diced tomatillos (they can even be a little under-ripe since they're getting cooked). Cook about 5 minutes at a simmer and then drain the pot or remove them with a slotted spoon. Done.

Another great hamburger seasoning is grilled or broiled or baked tomatillo. Stick the whole tomatillo (or 3) in the oven or toaster oven at 400 Fahrenheit and let it cook until it's a little soft of the skin breaks. This generally gets rid of some of the tang and you'll end up with a very sweet hamburger topping. That is, unless you buy your tomatillos in Toronto. I challenge you to find a good tomatillo there. Maybe from an organic market? The roasted tomatillos (when ripe) are also great with rice, kind of like Middle Eastern traditions squeeze a regular grilled tomato over their cooked basmati for flavour.

Tuesday, August 31, 2010

My Version of Hamburgers

My cooking is pre-meditated. I think about a recipe I want to make for a long time. Or I think about a food and then set about finding the perfect recipe. Unless I'm making a stir-fry, rarely do I just throw in a bit of this or a bit of that. Substitutions are another matter - discovering you don't have something you thought you had happens all the time. But I believe that food tastes better the first time you make something that you've never made before if you make it according to a recipe.

I've made hamburgers before. I understand the concept well. You take ground meat, spices, breadcrumbs (usually soaked in milk) and an egg, mix it all together, shape into patties, and grill it. That's all well and good, except I usually like to skip the breadcrumb bit (or at least cut back so it's not mostly bread inside two pieces of bread), I always want more flavour or spice in the meat, and I try to dilute the meat with vegetables or beans so I'm need eating a whole animal every time I grill. I'm all about eating an entire animal from head to hoof, but in small portions. So I combined my general disappointment with hamburgers with my general disappointment with veggie burgers and made something delicious.

See the problem with veggie burgers is they're not meat. Wait, vegetarians, don't hate me yet. Meat has fat and flavour (they're often synonymous) so it's really easy to make a good hamburger with meat. Vegetables need some help. That's why if a Chef makes me an amazing veggie burger I'll have a lot more respect for him or her than if he or she makes me an amazing meat burger. Unfortunately I've had a whole lot of awful veggie burgers in my life. To get a bunch of vegetables to stick together into a quasi-patty you need an emulsifier (egg, or oil if it's vegan, often) and you probably need to purée some if not all of the vegetables. That can mean potatoes, beans, onions, garlic, grains, carrots - all of which are good things, but they just aren't meat. Finally, you need to coat it in something since the sticky vegetables won't really get great grill marks if they're slimy enough to stick together. So you season well. You add salt and pepper, soy sauce, anything to give your meal flavour, but often it just doesn't work out. If you have to add a litre of ketchup to a cooked veggie burger something went horribly awry along the way.

The trick is to get to the point with the seasoning where you think you've added enough and then add more. Not necessarily more salt because that's not great, but more interesting spices, such as cumin or coriander. I even like fennel now. A smoky paprika is not a bad idea either, and my personal secret is dijon mustard. Not a spice, no, but a good distraction from the mild vegetables. My other trick? Skip the breadcrumbs and egg (skipping the egg also cuts the fat) and try to create an emusifier from psyllium powder. It's very high fibre and ridiculously good for you. So I used a breakfast cereal, All Bran Buds (weird, I know, but great) mixed with a whole lot of smoky Kozlik's dijon from St. Lawrence Market.

The smoke in it also makes it more bbq-y. That's an adjective, yes.

So here I combined the best of both worlds: fresh vegetables with some meat and a whole lot of heat and spice. It didn't stick together very well the first day but the leftovers were perfect.

Ingredients:
1 tsp olive oil
2 small onions (or 1 large), diced
1 green pepper, diced
3 small carrots, diced
1 hot red pepper, diced (seeds and membrane removed)
1/2 cup chicken stock (or vegetable or beef)
2 tbsp water
2-3 tbsp Emeril's Essence
1 cup to 1 1/2 cups ground meat of choice (my was pre-cooked but raw is fine as long as you cook until all the pink is gone. You end up with more fat in the dish this way which helps the burgers stick together, but you could cook it separately and then drain on paper towels before adding it.

1 cup All Bran Buds (or 1/2 cup bread crumbs plus 1 tsp psylllium fibre...approximately. Check the serving size recommendations because I've never used the straight powder)
3 tbsp dijon
1/2 tsp liquid smoke (my dijon had smoke flavour in it, so I didn't need this, but it's nice)

I was going to add puréed black beans but I forgot. This would have helped it all stick together well but also would have diluted the flavour.

Directions:
To get the All Bran all soft and emulsifying, stick it in a bowl and stir in the dijon. I think I would also add the 2 tablespoons of water at this point next time. The buds really suck in all the moisture. I would also mash them or purée after about 15 minutes to make it a smoother texture.

Dice all the vegetables and throw the onions into the hot oil in a large pot over medium-high heat. Let them sweat for about 5 minutes then add the carrots. 3 minutes later add the green pepper. 3 minutes later add the cooked or uncooked ground meat. Stir it all in and then add the hot red pepper. Cook 2 minutes then add Emeril's Essence (creole seasoning blend) and let it cook for 1 minute before adding the chicken broth and water. Reduce heat to medium-low and simmer about 5 minutes, or until most of the liquid has evaporated. Then remove the pot from the heat and stir in the All Bran and dijon.

You may be able to shape these into patties now, but if you can't, you can always serve them like sloppy joes on buns or bread, like I did for night one. Night two, they got turned into hamburgers and topped with my fresh chili paste instead of ketchup.

Some other options that might work well are to purée the vegetables before adding the meat. That'll make them stick together better. I kind of liked the texture and chew of keeping them all finely diced. I've eaten things with the consistency of baby food lately.

This worked out amazingly well because the All Bran seemed like meat, so even though there was just a cup of meat in the whole dish, it felt like a really rich chili. The dijon and spice mix added a whole lot of punch, but I should have used a sweeter bun. My toasted bread made the whole thing seem too dense. Something fluffier would have been better. It's really nice with lettuce, though, because the cold crunch complements the heat of the highly cooked ground meat. AND I also added my newest favourite condiment (way better than ketchup): Thai Chile Paste, and then cooked some zucchini and tomatillos in the same pot that I'd cooked the chile paste in, after just adding a little water. So they were spicy but tangy and the chile paste was sweet and hot! Recipes to come.

Sunday, August 29, 2010

Eggplant with Ground Venison and Cilantro

Sometimes I make things that don't look very appetizing. If I'm just making them for myself I don't put a whole lot of extra effort into making them look pretty, but then in you come, reader, making me add garnishes. I have this feeling you will think I'm a better cook if I add cilantro, for example.

My new favourite thing to do is take part of one dish and use it as the base for another. Like Indian eternal recycling - turning dinner into breakfast, or leftover rice that gets added to new rice, that gets added to new rice, that gets added to new rice, etc. So I knew I wanted to make burritos and hamburgers out of ground meat and I stumbled upon some venison at the Mile End Farmers' Market. It sounds so much worse when you say "deer" but it's the same thing. Remember my wontons? Yeah, those were deer too. I bought a pound of the ground stuff (much cheaper than a steak or even a shank since it's the fatty odds and ends) and put it to work. I used a 1/4 cup for the tomatillo salsa but I wasn't about to cook up a 1/4 cup of it and put the rest of the raw meat back in the fridge. I cooked it all up and added a tiny bit of salt (actually I messed it up and added salt to all of it instead of just the quarter cup for the salsa...but it was better that way). I had some gorgeous eggplants and I figured one way to liven up eggplant is with ground meat. Moussaka has been getting it right for ages. It's like Greek Shepherd's Pie but with bechamel sauce. So I guess they've got it better than us, the Greeks.

After cooking the deer (venison) meat in a large pot until it was no longer pink, I removed it from the pot and added some water to unstick the remaining meat. Normally I do this and just let it sit until I wash up, but I figured I was going to boil the eggplant anyway (my new favourite eggplant technique from VietWorldKitchen) so might as well use the same pot. I brought the water to a boil, stuck the eggplant in and let it boil away.

Now venison is a very lean meat, so even the ground meat isn't that fatty. I didn't really need to press the fat out of it, so I just removed it to some paper towels. I boiled the eggplant whole until the skin changed colour on all sides (this only happens when the eggplant is completely submerged so you have to turn it halfway through), removed it from the water/fat and let it cool before peeling.

Apparently eggplant skin is not very thick (though I haven't tried insulting it lately), so the fat from the deer soaked through into the flesh, making it a little more slimy. This is a very good thing. It adds a tiny bit of flavour, but it adds a lot of the oily texture of Indian bharta that I love with all my heart. I usually mash my eggplant but this time I just sliced it into big chunks and topped it with some ground venison and cilantro. This is very plain. Just salt and cilantro for spices, so I sprinkled it with my chaat masala whose mango powder gave the dish a little punch. Then I added some puréed swiss chard (for a little more bitter green) and I don't remember why I had onions cooked at the time in tomatoes, but I did. It made a strange-looking meal with my sourdough raisin bread from the Plateau Market (my new highlight of the week from LaPerle et son Boulanger) but it was so filling. Eggplant is like baby food and there's a comforting quality to it. The swiss chard is so good for you and bitter, the chew comes from the venison and the toughter chew (or crunch if you toast it) comes from the bread.

None of these things are hamburgers or burritos but I'm getting to that.

Thursday, August 26, 2010

Braised Fennel: Bonnie Stern's "Heartsmart Cooking"

If you like balsamic vinegar, the thick, sweet kind, on your tomatoes you will like this braised fennel with fresh tomatoes. I'm not sure if the fennel flavour itself works with the tomatoes, but on its own it tastes way too much like candy to call it salad.

I fell in love with fennel through my roasting bible. All you do is roast them with a little oil and then sprinkle with lemon juice and the whole licorice flavour explodes, but it's not as sharp and it becomes a little sweeter from the roasting. I still can't quite handle the sharp flavour of fennel when raw.

I just wish fennel weren't so expensive. I thought I got a deal on these. Seventy-five cents a bulb, but the bulbs were small and more of the outer layers weren't edible, so really I don't think it was worth it, especially since the reduced vinegar-honey sauce soaks into the inedible leaves and you end up sucking out way too much of it without having it be diluted by delicious fennel flavour. So it's way too intense and my teeth ache and I get a headache and a sugar rush and can't eat these for dinner or I'll be up all night. Ridiculous, I know.

I also don't think the honey is necessarily essential. Reduced balsamic on its own might be fine unless you have a really big sweet tooth and crave the honey. Finally, I think it could use a squeeze of lemon at the end.

Next time.

Ingredients:
2 large fennel bulbs (not 3 squat, tendrous ones like I had), bottom trimmed, stems removed, and cut through the core into wedges (you can reserve the fluffy green stuff to use as garnish or use it as dill in another recipe. It's not exactly dill but it works)
1 tsp olive oil
1 1/2 tbsp honey (the original recipe calls for 3 tbsp)
1/3 cup balsamic vinegar
1/2 tsp salt
1/2 cup water plus a few tablespoons extra

First heat the oil over medium-high heat in a large skillet and when it's hot add the fennel wedges. Let them brown on one side (don't stir them) for 3 minutes then flip them over and let them brown on the other side. How egalitarian.

Add the honey and balsamic vinegar and stir to get all the nooks covered in liquid. Then add the salt and water and stir again.

The liquid is probably already boiling but if not, bring it to a boil and then reduce the heat to medium. Cook, stirring when you think about it (or at timed intervals if you're not good at remembering these things. there's no shame in setting a kitchen timer), for about 25 minutes, or until the fennel is tender. You may have to add a little extra water (a tablespoon at a time as needed) so the glaze doesn't start to stick to the bottom of the skillet and burn. It's already a very intense flavour, so a little diluted reduction is better than a little scorched reduction.

Serve as a side dish or on a salad. I think it's amazing on rice or couscous because the starch soaks up the sticky, sweet sauce, kind of like a good hoisin or teriyaki sauce. Completely different flavour, but just as much sugar. Like I said, it tastes like dessert. Oh! You can just make this sauce without the fennel (and oil), cook it for 20-25 minutes to make a glaze, and then serve on ice cream. It's also amazing with strawberries, and very traditional. If you've never had fennel before, though, this is a great way to try it.

Friday, August 6, 2010

Vietnamese Hmong Spicy Eggplant

I found a new, wonderful website. It's not new, but it's new to me: VietWorldKitchen. I was reading about pho', but then I saw this recipe, and it basically made my day. Maybe it was a slow day, but, oh, how I love eggplant. I didn't have any scallions or cilantro, and I only had dried chilies, so I kind of massacred the recipe, but it worked out well in the end, and I got to use my mortar and pestle, which is basically my goal in life.

I boiled my eggplants whole in some water, turning them to cook them through (they were the long, thin kind, so slightly less bitter than the big purple ones. They were at a very good price at my farmers' markets). Then I let them cool while I chopped some fresh mint (it's what I had. I didn't know if it would be a good replacement for cilantro, but I figured I'd give it a go. Oh, I also threw 8 red chilies into the eggplant-boiling liquid to resuscitate them. The recipe calls for fresh, but no way was I going to go out and buy eight chilies when they probably wouldn't even end up being the right kind anyway. So I sliced my resuscitated (and slightly boiled...) chilies open, got rid of the hot seeds (the seeds don't add flavour, just burning heat) and threw the flesh into the mortar and pestle with the salt and mint.  I just skipped the scallion, but I could have added some diced shallot if I'd wanted.

Now the fun part - the mashing. You crush it all up with the pestle. There is good mortar and pestle technique and then there's bad.  Mine is lacking. I watched an episode of Poh's Kitchen (you can find the podcast on iTunes for free) where she talks about it, but it's a small screen on my iPod and I'm maybe a slow learner. Anyway, everything got mashed in the end, and that's the point, really. You're now supposed to mash in the peeled eggplant, so I mashed a little at a time, and then just mashed in another bigger bowl (carefully!). The above picture is what came out. Oh it was so good. My chilies weren't Thai chilies so the heat was different, but my goodness it was hot. Now I love heat. I LOVE heat, but this was really, really hot. I ate a lot of it anyway, because the flavour was still SO good (my tongue could still find flavour through the slightly mind-numbing heat), but if you are scared of heat, I'd say use 2-3 chilies only. You're missing all the fun, and colour, but you won't have a fit on the flour. Not that I did.

Oh, the mint worked out nicely in the end.

Wednesday, August 4, 2010

Chickpea Chili

When you go to as many farmers' markets as I do, you end up with a whole lot of vegetables, and even I get stumped on what to do with them sometimes. It's not that I don't know how to cook them, but they don't always have to be side-dishes, so finding recipes that combine them in interesting and tasty ways can be more of a challenge. A good challenge. A potentially delicious challenge, and therein lies the fun.

These vegetables are so beautiful that you buy them on a whim, promising yourself you'll use them. But the first beautiful item is replaced by the next beautiful item and another promise. So when I realized I had a few items in my fridge I'd temporarily forgotten about, I chastised myself and went looking for a recipe that would use them to their full potential.

I've lately been boiling all the mountains of green beans I'd purchased in delicious leftover pho' beef or chicken broths for a side dish, but after cooking up a whole bunch of chickpeas, freezing them, and realizing that they were taking up way too much room in my freezer, something had to be done that would combine my beans, zucchini and frozen chickpeas. So I turned to Judith Finlayson's aptly-named slow-cooker cookbook, "Delicious and Dependable," and it sure was. You don't have to make this recipe in a slow-cooker. A big pot on the stove is absolutely fine. Just let it cook for about 30 minutes at a simmer instead of turning on the slow-cooker. Then when you add the corn and zucchini at the end, just 5 minutes of more cooking is fine.

I settled on "Two Bean Chili with Zucchini". I chose it because I had all the ingredients, from the perfect number of dried ancho chilies to the can of tomatoes (San Marzanos) in my cupboard, to the frozen corn kernels also taking up way too much space in my freezer when fresh corn is coming into season, and of course I had all the dried spices. It's rare that a lack of spices is my recipe downfall.

I've had ancho chilies since I made the Santa Fe Sweet Potato Soup recipe from the same book, and it was phenomenal. Since then just the thought of ancho chilies has made me happy, and I think they can do no wrong. I am, unfortunately, not above such wrong-doing. When you use dried chilies you have to soak them in boiling water for about 30 minutes. While you do this you need to make sure the chilies are completely covered by the water. If an end sticks out it'll stay hard and you'll end up chewing your chili pepper. This is very undesirable. So you put a plate on top of the bowl of chilies in boiling water to press the chilies down into the liquid. The problem is you can't really see into the bowl to make sure the chilies are completely covered, and it's not until 30 minutes later when you require the use of your soaked chilies that you realize they're not properly soaked. So be careful. That's about all I can say. Make sure your plate that's keeping the chilies submerged is big enough, but not too big, and the bowl is flat and fairly heavy. You can also try turning the your chilies over in the water after 15 minutes to make sure each side is submerged for at least half the time.

Next, you need to sweat your zucchinis. In Montreal you'd think this would happen naturally...but no, they need to be salted first. Chop your zucchinis into 1/2" lengths (I had no idea what this meant. Cut them lengthwise into 1/2" length and width, making the height the whole length of the zucchini? Length is a very ambiguous term...cut your zucchinis however you please...I like quartering the zucchini length wise, and then chopping along the length of the lengths about 1/2" apart. This is probably about what Judith means, but she doesn't specify to quarter the zucchini first. I didn't think big coins of zucchini would work well in this recipe. I generally think diced vegetables are best for chili but you can get away with less chopping work by blaming Judith's less than clear instructions). So chop them as you see fit, sprinkle them with salt (preferably coarse salt), and place them in a colander. The liquid will drain out of them. After 20 or 30 minutes (whenever it's convenient for you) rinse the salt from the zucchini and pat them dry with paper towel. Rinsing them won't make them soggy again that quickly, so don't worry. You need the liquid out of them to sauté them properly. If you don't sweat them they'll get mushy in the skillet. This way they'll brown up nicely and be more meaty. 

While the zucchini are sweating, chop a bunch of onions and garlic. It really doesn't matter how many. A lot is great. Now you need to wait for your zucchinis to sweat. If you're sweating, not the zucchini, get some ice for yourself and a glass of water. You should not be a puddle by the end of this recipe, and slow-cookers heat up your entire home.

Heat a little oil over medium heat and then add the zucchini. Stir until they brown on all sides. Then move them to a bowl and let them cool before refrigerating. Now sauté the onions and garlic in the leftover oil in the skillet. Let them soften for a good 5 minutes at least. Crunchy onions are no good in this recipe. Then in went the spices: oregano, salt, pepper, and cumin. They got cooked for 1 minute to coat the onions and garlic, and then in went the tomatoes and green beans. I just rinsed the green beans in advance and cut the really long ones, because the recipe said they could be up to 2" long! Like the zucchini I thought this was too big, so you could cut them into 1" lengths, or whatever length you prefer. It's kind of funny, though, struggling to eat long green beans with a spoon.

Now the recipe messed up. Editors, what happened?? I went to all that trouble of soaking the ancho chilies and there is no indication in the recipe of when to add them! Here I am looking around my kitchen thinking I've added everything, when I spot the bowl of chilies. When do they go in? They definitely go in before the slow-cooker gets turned on in the next step. So I shook my head, drained the chilies, removed the seeds, diced them, and added them to the pot (quickly! because I didn't want too much liquid to evaporate).

The tomatoes were coarsely chopped already, so the whole mixture just needed a little stir and it came quickly to a boil. Then into the slow-cooker it went and I mixed in 2 cups of chickpeas. The recipe says romano or pinto, but with beans I'm generally not too fussy. Chickpeas do taste a whole lot different, but they weren't going to taste bad.

Then all that was left was to turn the mixture to high for 4 hours in the slow-cooker. 4 hours of eager anticipation. 20 minutes before dinner I added the 1 1/2 cups of corn kernels and the refrigerated zucchini, and turned the slow cooker to high. The amazing thing about slow-cookers is that even though the colour fades on green vegetables, they stay fairly crisp. The zucchini was still firm (not too much, but just right) and the green beans were a tiny bit crunchy. No mushy, over-cooked vegetables. Hurray! I actually picked through my bowl in search of the zucchini, they were so good. It may also have had to do with the fact they were a little saltier than the other vegetables and beans...maybe. Still, this is a great way to get the best flavour out of your vegetables if you're going to cook them. You could also replace the vegetables with other things, like carrots, celery, or peas. With chili, the world is your oyster. Maybe don't add oysters...though worchestershire sauce is a good call because of the tamarind. I have no idea why oysters made me think of worchestershire sauce...hmm...I wonder what oyster sauce would be like...

Friday, July 23, 2010

I Swear It's Better Than It Looks: Boiled Eggplant Sautéd In Lamb Fat

Remember how I love eggplant? There's something absolutely delicious about how slimy it can be. It becomes soft and mushy and very mild. Different kinds, especially the long, thinner purple Asian ones, aren't as bitter as the regular pear-shaped ones. Slimmer is not always better, but it seems that in this metaphor the larger ones are bitter about their bottoms.

All joking aside, there was still a fair bit of lamb fat in the skillet after sauté-ing my potatoes, and I hate letting things that great go to waste. So I decided to sauté the eggplant that I'd boiled whole (got the idea from a Vietnamese recipe blog when researching pho) in what was left of the fat. Well the eggplant sure sucked up the leftovers! It actually started to burn. So that's why Indian and Chinese eggplant dishes are so luscious...they need a ridiculous amount of oil or fat to keep the eggplant from sticking to the wok or pot!

The result? The eggplant was bland, even with the oil. Only the texture was different, becoming a bit more slimy (which I actually like. Maybe it's an acquired taste, like oysters) with the additional oil. I did a comparison with some un-sautéd, boiled eggplant to be sure. So what I ended up doing was adding a bit of chaat masala for flavour. It was a cheat baigan bharta, but the mango powder ended up being delicious and there was more than enough salt in the masala to bring out the flavour. Now I have leftover eggplant for amazing sandwiches. I'll just sprinkle on a bit of chaat masala, add a few more vegetables and some puréed chickpeas, and die happy.

Sunday, July 18, 2010

Dehydrating Things...

I kind of love the idea of taking a whole head of something green and easily turning it into something deliciously snack-able. I decided to try more dehydrating since it was so easy and I never otherwise eat chips. Back to "Making Love In The Kitchen" from the National Post, from where I took a few more recipes, decided I didn't quite like them, changed them, and created my own batches of kale chips.

Macro-Asian Kale Chips
Ingredients:
1/2 head of kale, washed and torn into small pieces
juice of half a lemon
1 tbsp miso
1/2 tsp ground ginger
1/2 tbsp ground almonds

Sweet Thai Kale Chips
1/2 head of kale, washed and torn into small pieces
3/4 tsp sugar substitute (or sugar, or honey)
2 tbsp rice vinegar
1/4 tsp sriracha hot sauce (the big red bottles at Thai, Chinese, or Vietanamese restaurants, or a sweet hot sauce, or hot sauce plus a bit of extra sugar)
1 tbsp chopped peanuts
1/8 tsp salt

Basically I had some leftover sweetened vinaigrette from some thai noodles in a small container along with some peanuts and hot sauce from the Cambodian/Malaysian festival at Parc Jean-Drapeau last weekend, so I figured I'd use it here instead of on more noodles. I kind of O.D.'d on noodles...mmm...The macro-asian chips I just wanted to try without sesame and oil. Basically I wanted to see if this worked fine without the added fats. I only added the almonds at the last minute for a bit of texture, but kept the quantity very low.

All you do is mix all the ingredients together, lay them out in a single layer in two big baking sheets, and stick them in the oven with the door slightly open on the lowest possible temperature for about 4 hours, or until they're crispy. They stick to the bottom of the pan, so you can use wax paper and save yourself some clean-up (and some waste, since the kale dehydrates and you actually lose a fair bit to the baking sheet).

It kind of helps to turn them halfway, to make sure it all dehydrates evenly, but if you don't it's really not the end of the world. So some chips are more crispy than others. You can honestly use any ingredients here and these will be delicious, as long as there's a tiny bit of salt involved. Dehydrated plain kale is all well and good, but it has no taste. The miso is very salty, so feel free to cut back on that if it's too much, and if you want to avoid sugar, feel free to leave it out, along with honey or other sugary substitutes. The only way to make this gross, I think is to have no real seasoning. Herbs won't cut it. Dairy is not a great idea because you're leaving it out at a not so great temperature. Miso is okay because the fermentation is good, that's why I left it in there, but meat would be an awful idea, because I don't know what this is like for bacteria and contamination. Keep it vegan-friendly and you'll be in the clear. Oh, and happy. Probably glowing, like all those raw foodists seem to be.

Saturday, July 3, 2010

Dehydrated Kale Chips

More raw eating. How can you make kale any better for you? Well, I don't think it gets better, but it gets tastier and less of a trial to force into your body, like potato chips. Not in that potato chips are hard to force into your body, but that it's easy to eat a lot of them...too many in fact. Is there such a thing as too many kale chips? Yes, it turns out that there is. My ill-made point is that it's easier to eat a whole bag of potato chips than a small bag of bland, uncooked potatoes. Maybe not the best comparison, but it does the trick.

Much more delicious than they sound, these chips are from The National Post's cooking blog "Making Love In the Kitchen". I like it, overall. The woman's pretty knowledgeable, happy, and honest. Globe & Mail, if you want to compete with this, I am available (feel free to contact these people on my behalf. Choose someone from the Life section). I'm not saying I'm her equal, but you can definitely afford me. Anyway, the blog gives all sorts of different seasonings for dehydrating kale chips, all of which have too much fat, in my opinion, but the method is sound, and the result is delicious.

These things fall apart in your mouth, the chips. They dissolve from paper-thin pieces of green parchment to pools of salty, spicy flavour. I love it.

My variation on the Macro-Asian Kale Chips recipe:

1 Head of Kale, washed, dried and torn into bite size pieces
3 sheets of nori, cut with scissors into small pieces (this took forever! but it was very much worth it in the end, since the nori doesn't fall apart like the kale, and you end up with chewy little pieces that are covered in the delicious marinade)

Marinade
2 tbsp cup black sesame seeds (or white will work too)
2 tbsp miso paste
2 tbsp lemon juice (the juice of 1/2 - 1 lemon)
1/2 tsp fleur de sel (it's what I had, but use any salt is fine)
1 tbsp sesame oil
2 tsp tamari
cayenne to taste (I ended up dumping in too much by accident. Good thing I like it spicy...)

Put the marinade ingredients in a blender and process them until they're smooth. The recipe says as a little water as you need, and I think I used about 2 tbsp. It just takes longer to dehydrate the kale if you use more water.

Then put the nori, washed kale and marinade together in a large bowl and massage well with your hands. You really want to coat everywhere. Oh, the recipe originally called for 1 tbsp of maple syrup and I just left it out. Normally I'd replace it with honey, but I wanted a more savoury chip. Use your liquid sweetener of choice.

Line a baking sheet in parchment paper and put it in the oven on the lowest possible temperature with the door open. I'm pretty sure in the current Montreal weather this step is unnecessary...it certainly feels like my apartment is hotter than my oven. I have never felt so much like a baked good...I should just put the raw kale in me to cook and by the time it digests it'll be dehydrated, along with the rest of me.

So you can also do this recipe in a dehydrator but who has one of those? Unless you're "raw". The oven works fine. I left it overnight. I know I know, I shouldn't leave the oven on overnight, but it was so low and I was there the whole time, and my fire alarm works, so I took my chances. It was worth it. The chips were absolutely delicious. I don't like all the sesame, but the lemon and cayenne with the miso and tamari gave a really nice acidic and salty bite to the chips. Basically it feels like you're eating marinade and air...more delicious than you'd think. So the next time you don't know what to do with a head of kale and you don't feel like chewing, and chewing and chewing, try this out. You won't believe how fast the head of kale disappears into your stomach. OH! and feel free to leave out the oil in the recipes. It's kind of a preservative if you use it, so the kale'll l last longer in the fridge, but you can happily eat more of it at once without it. You won't even get sick from eating too heavy a snack, or, God forbid, spoil your dinner. People apparently still do that. Not just kids.

Friday, July 2, 2010

Best Recipes of 2010? Um, no ("Cooking Light", How Far You've Fallen In My Eyes)

I have two very good magazines that I picked up randomly at grocery stores a long time ago in highschool. You know when you're waiting at the check-out and you see these beautiful pictures and you browse, but rarely buy. Magazines are not cookbooks, so the amount of quality you get for your money is not as high, in general. Sometimes, however, maybe once in a blue moon, there are pictures that are just to die for. I do admit to having bought a magazine for the gorgeous picture of just one recipe on the front cover. I generally try to look through and make sure there are other recipes I'd want to try, to justify the purchase, but light versions of banana cream and custard pies are sometimes impossible to resist.

In these rushed decision purchases I've only ever bought Cooking Light. Other publications are aimed at mothers, and I'm just not attracted to "20 Minute Meatloaf: A World of Variation" and other such things. I haven't bought a magazine in a long time, mostly because I don't really go to big grocery stores anymore, but when I saw Cooking Light's compilation of the best recipes of 2010 when I was home over Christmas (where are not so many small grocers or markets from which to buy my foodstuffs) I figured it was a safe bet. Surely a magazine that had given me some truly delicious recipes on other occasions would give a great "best of..." version. The recipes all looked fine...just fine, not great, but I held out on faith in a brand and added the magazine to my cart.

So this was the first recipe I tried - Spiced Potatoes and Green Beans. It resembled a lot of the Indian recipes I had been making lately, so I figured it would be great. I also love using new mexican chile, and I have some dried ones sitting in my cupboard waiting to be used. What an opportunity. Quelle chance (this is horrible French. Never use it...).

Unfortunately, no, this was not a stupendous recipe. If I published a magazine of all the recipes I've personally made in 2010 this recipe would not be included. I think the focus of Cooking Light has changed. Since this disappointment I've looked at other recent editions, and some published books including "The Best of Cooking Light" and been really upset at all the cheats they use. Like fat-free caramels to make an icing. "Healthy" is not what these caramels are. Yes, they're "low fat" but I don't want to put that in my body. They call for fat-free mayos and sour creams. These are pretty standard, and do get the fat content down, but my biggest complaint with the recipes is that they're just not that adventurous. It seems like the editors are now catering to the same market as "Canadian Living" and "Chatelaine", just making things a little less fatty. The "ethnic" ones aren't particularly exciting, being rather North American-ized versions of the originals. In the magazines I'd bought years ago they'd had some great, authentic recipes along with stories of families with different cultural heritages making these traditional recipes in North America, celebrating different customs, and generally being entertaining. Still, it's all about flavour, and I've got a few more recipes to try before I say, decidedly, that this isn't a great publication anymore.

Anyway, here's the recipe, in case you're looking for a recipe that's not spectacular, but not hard to make either.
Ingredients:
1 New Mexican Chile (It didn't say if it should be fresh or dried, but it's impossible to find fresh ones, so I figured it had to mean dried. New Mexican Chilies are pretty mild, and in a pinch you could replace the one in this recipe with another large chili. Anaheim would be a good choice)
2 tbsp canola oil (maybe it was worse because I skimped on the oil. Really, potatoes fried in more oil get a better crust, but even then there wasn't a lot of flavour - spice flavour - to season)
1/2 tsp brown mustard seeds
1 big onion, finely chopped
3 cloves garlic, minced
1 tsp ground cumin
1 tsp ground coriander (I even ground fresh ones but they couldn't save the recipe. I think next time I would toast these in a frying pan over medium heat until they're aromatic, and THEN grind them)
1 tsp fresh ginger, minced
1/4 tsp ground turmeric
1 pound potatoes, cut into small chunks (I even used yukon gold like they suggested. You can also use red. I don't think it makes it any better. I think you need more spice for the amount of potato called-for. I weighed mine, so I know I had the called-for ratio)
1/2 cup water (now here's where the recipe could be automatically improved. Try chicken or vegetable broth instead of water. The trend in restaurants would be to use duck fat, but that's just ridiculous. No Indian would use duck fat. Ghee yes, duck fat, no...an Indian cook would laugh in your face...unless it was Vij in Vancouver, but there are many reasons I don't care about ever eating at that restaurant)
3/4 tsp salt (I usually skimp on salt, but don't skimp in this recipe. It's already skimped-on)
8 oz asparagus, cut into 1" pieces (the original recipe is for green beans but I know this didn't make my recipe any worse)
1/4 cup fresh cilantro

You need to process or blend the chile in a coffee grinder, blender or food processor, but again, the recipe doesn't say if it becomes a paste (fresh chilies) or a powder (dried). Bad editing?
Then heat the oil over medium-high, and when hot, add the mustard seeds. 30 seconds later (I thought this was going to be a good recipe because they did the Madhur Jaffrey-style procedure or sauté-ing things for 30 seconds, or 1 minute, or very precise amounts of time per spice and per ingredient addition. Alas, no) add the onion. Stir for 2 minutes, then add the chile, garlic, cumin, coriander, ginger and turmeric. Stir for 30 seconds then add the potatoes. Stir to coat for 2 minutes, then add the water and salt. Bring the pot to a boil, cover, reduce the heat to medium-low and simmer for 8 minutes.

The potatoes should be tender. Then add the asparagus, re-cover, and cook for 5 minutes more. They shouldn't be lifeless, the asparagus. Leave them just a little crisp, but at a point where you won't have trouble chewing them. Then stir in the cilantro. If there's excess liquid, remove the lid and boil it off to a consistency you can live with. There are many things you can live with. Fortunately, bland potatoes are one of them.

Sunday, June 20, 2010

My Favourite Vegetarian Indian Dish: Baigan Bhartha (Eggplant)

I realize the definition of insanity is trying the same thing over and over again and expecting different results, which is kind of how I feel about my repeated efforts to make baigan bhartha. I feel somewhat justified in the fact that I keep trying different recipes, but does that make me only sort of crazy, or just stubbornly determined?

When I go to an Indian restaurant I want meat. Vegetarian seems like a waste. For all the oil they add, it's just not as mind-blowing as it should be. Meat is where the real special-occasion flavour-fat splurge comes into play. Long-cooked cubes of meat dissolve in rich, oily, intoxicating stews. All the spices just make the rich flavours of the meat jump out in a way that lentils can only dream of. Don't get me wrong, I love saag and I like daal, but I will always go with the lamb dish.

The only exception to my rule is baigan bhartha. When I see this smoky eggplant dish on the menu I get the same pang of desire that I get when I see lamb roganjosh (in a smell test I will forever go with the lamb...). In a restaurant the eggplant is cooked until mushy in a tandoor (sometimes) and then added to a lusciously oily mix of spices and often tomatoes. I have tried (mostly in vain) to recreate the restaurant experience at home. My failure has a whole lot to do with the fact that I refuse to use about 10 tablespoons of oil and a little to do with not owning a tandoor or even a real grill or charcoal BBQ. My latest attempt was pretty good, but it just didn't get the smokiness of a tandoor. Next time maybe I will add some liquid smoke.

What I did use to guarantee that at least the dish wouldn't be too acidic were San Marzano tomatoes. These are the gods of tomatoes. Italian Grandmothers weap over these tomatoes. Not regularly, mind you, but in the strange case where they didn't can enough to make it through the winter and spring. I mean, they could buy the canned ones, which are amazing, but that might be embarrassing for them. I am not an Italian Grandmother. I am not easily embarrassed.

The thing about these tomatoes is that they come from one region in Italy where the tomatoes are naturally very sweet. So the acidity is very low and when you cook with them you don't need to add any sugar. If you taste a tomato sauce and it tastes sweet the cook probably added sugar, and if you call them on it they will be embarrassed. He or she is probably not an Italian Grandmother either, but still fairly easily embarrassed.

This isn't even an Italian recipe and here I am off on a tangent about a country's grandmothers. Back to India.

...

(It's a long trip)

Anyway, this bhartha recipe was not bad. I think I needed a higher eggplant to tomato ratio, since it turned out more like a bruschetta with eggplant or the world's best ratatouille, or a really good pasta sauce or pizza sauce, rather than a very good bhartha. None of these alternatives are bad, however, and the leftovers were turned into all of the above - successfully. The only funny thing is that every time I had this dish I got thirsty, which makes me think I used too much salt. Since I checked the tomatoes and there was just about no sodium in the can (another plus of San Marzanos) it had to be from the bhartha recipe.

Ingredients:
2 long, thin eggplants (I didn't use the purple ones or the really huge standard ones, but a few smaller standard ones instead. I hoped this would minimize the natural bitterness of the vegetable. I also peeled them since a lot of the bitterness is in the skin)
1 tbsp oil
1 tsp cumin seeds
1 large onion, diced
1 tbsp ginger, grated
1 can San Marzano tomatoes
3 long red chilies (the recipe called for long green chilies, but the red ones turn green after they're red, so I figured it'd be okay...and I couldn't wait that long. I had a bunch sitting in my kitchen and I was not about to go out and buy another bunch, as much as I am obsessed with heat)
1/2 tsp garam masala (home-made!!! Hurray!)
Red chili flakes (to taste. Probably 0 teaspoons for the weak of heart. About 1/2 a teaspoon for me...I know, ridiculous. It's not even a matter of pride, as in "See how much heat I can take!" It really is that I am addicted and on my tongue it helps bring out the other flavours. I still taste everything else. My tolerance has gone up and I need more of the drug to get my fix. Really, it's a relatively healthy addiction, mom)
Salt, to taste (I swear I only put in a pinch because salt is essential, but somehow it ended up too salty. Who knows?)
1 whole cup of cilantro leaves (really, less is fine since it's just for garnish. I don't even like adding it directly to the pan unless you're going to eat all of it in one go. It shouldn't be reheated. Much better when it's fresh)

You're supposed to grill the eggplant but I don't really have a grill. I always roast it. The point is you want it cooked, and roasting is so easy. Preheat the oven to 425 degrees Fahrenheit. Cut the eggplants in half lengthwise and then score them (mark 'X's in the flesh with a knife). Place them flesh-side up on a baking sheet and pop them in the oven for about 30 minutes, or until they're soft (mushy is fine. They just shouldn't be tough or rubbery. Pressing down on them with the back of a fork should cause the eggplant meat to break apart pretty easily. Just taste it and if it has to be really chewed, it's not done). I kind of just stick them in as soon as I can in the getting-dinner-ready process and cross my fingers they're soft by the time I need them. My success rate is okay. I'm working on it...

While the eggplant is roasting (or grilling. The grilling will make it more charred and give a quasi-tandoori smoky flavour) cut the onion and measure out all the spices. The ginger and garlic can go in the same bowl and the tomatoes, red chilies, and garam masala can go together in another. Everything else needs its own plate or dish.

This dish is best served with bread, not rice (the recipe actually suggests roti, naan, phulka, chapathi or paratha. So take your pick of Indian flat bread. I say Italian piadina works fine. Regular bread - like a country loaf, not Dempsters - will turn this into bruschetta), so get that all ready to go (if you're toasting or heating, put it on a plate or set it in the toaster oven and don't turn it on, etc). Basically do everything you can to waste time while the eggplant is cooking. Eat a salad, if the mood strikes.

When the eggplant is done take it out of the oven. Don't scoop out the flesh now. It's too hot. I have enough burned fingers for us both.

Now heat the oil in a large pan or skillet. Keep it to one area of the pan while it heats on medium-high. Then add the cumin seeds to the oil. This minimizes the amount of oil you need. Wait 5 seconds and then add the onions. The worst thing you can do is not cook the onions long enough, and sadly this is easy since you're not using a lot of oil. Use 3 tbsp of oil if you absolutely love fried onions, but I'm telling you it's a waste because in the end the onions won't taste fried. They'll just be swimming in tomato sauce and it'll be a waste of the oil. So it's your choice.

You have to stir the onions religiously or they'll burn. If they start to stick add a tablespoon of water. Add more water a tablespoon at a time each time the onions start to stick.

When the onions are soft, not crunchy (up to 10 minutes), add the ginger and garlic and stir and cook for 3 minutes. Again, no burning allowed.
Now add the tomatoes, fresh chilies and garam masala. Add the red chili flakes if you want and taste first, and then add a little salt only if it needs it. Turn the heat to low and cook for 10 minutes. If the sauce is thick it might start to spit a little, so you can cover it if you want.

Finally, a chance to rip apart eggplants.

Scoop the flesh out of the eggplants and chop it roughly. Okay, it's true, the eggplants could have been sitting in the oven cooking all this time you've been dealing with onions and the like, but then when you took them out just a moment ago they'd have been too hot to handle. So if you're in a time bind, be prepared to use gloves or burn your fingers to get your eggplants properly cooked. Slimy chunks of eggplant are what you're after. Unappealing now, maybe, but I swear, completely delicious.

Now add your delicious eggplant slime to the tomato mixture. Cook and stir for 5 minutes. Garnish with cilantro. Dream of an even better eggplant recipe next time, and how much you love bruschetta.