Tuesday, November 30, 2010

Persimmons and Pears with Cinnamon and Star Anise: The Season's Last Adventure in Canning

I love the Atwater library. Anywhere I can walk in and take books out for free is a miraculous thing to me. Atwater just happens to be the version of that system closest to my house. There's actually a membership (which I think defeats the purpose of "free lending"...I actually laughed at my roommate last year when he BOUGHT a membership) but it's so little and so convenient that it's worth it.

There's a cookbook section. Of course, I do read other things...but put me in front of two bookshelves on foodstuffs and I'm a happy camper. I took out three canning books (mostly out of practicality, since I couldn't carry more than that at the time) awhile ago and proceeded to pickle up a storm. The last thing I made before returning the books was a recipe for canned pears. I had a few persimmons kicking around and so I threw those in too, hoping that was kosher. Someone will tell me now if it's not, I hope. I left one jar un-canned and enjoyed the fruit in the fresh syrup.
So I can't give you the exact recipe I used, but find yourself a library or a reputable online canning source, and go to it. It was really simple, and pear and star anise is a basic combo. You take some sugar and water in a pot. Dissolve the sugar, and bring the liquid to a boil. Add the cinnamon sticks (I added extra ground cinnamon as well) and star anise and reduce the heat to let the syrup thicken and the spices infuse.

Peel and core the fruit and remove any soft spots or overripe sections. Slice them into sizes that will fit into jars. If they can't get in easily, they can't get out easily, and you don't want to be sitting around a few weeks later bemoaning the fact that the slice of pear you're craving is playing hard to get.

Sterilize the jars, put the fruit in the jars, almost to the top, pour on the hot syrup. Place the warmed lids on the hot jars, put sterilized rings on top of the lids, and process them again. I forget how long I had to process them, but it was pretty painless. Much easier than jam since the liquid doesn't have to get to the jam stage. So it was more like a pickle, but with sugar. See, I know nothing about canning. It was so nothing like a pickle.

The cans looked beautiful, and I decided to can the cinnamon sticks with the fruit, so the syrup will keep infusing over time. Now I know some people don't like cinnamon as much as I do and it may get overpowering, but anyone to whom I offer this fruit is going to have to like cinnamon. Otherwise, what the heck are they doing in my kitchen? Go find another kitchen to pillage.

You know what? The fruit gets better and better as it softens in the syrup, but since it's a simple syrup, what made this INCREDIBLE was eating it with my ginger confit. Absolutely amazing. The ginger cut through the sweetness, and then the earthy power of the cinnamon...and then the bitterness of the star anise...nothing like it. If you don't want to can you can just cook the fruit pieces a little in the syrup while it's simmering. That works too, but you can't enjoy it a month later when persimmons are no longer in season...So if you can can...

Saturday, November 27, 2010

Inexpensive Moong Dal and the Montreal Metro's Helpful Spice-Grinding Tips

So I was in the metro yesterday and looked up at the big MetroVision screens that tell you when the next train is coming and give you some generally uninformative news headlines, when lo and behold, I read the following:
"To grind spices in a mortar and pestle, crush them using an up and down motion."
Now that's loosely paraphrasing from the French but the "up and down motion" was pretty word for word ("d'haut en bas" I think?). Well, thanks MetroVision. And here I thought you never did much of use besides pass the time, but no, here you are informing the Quebec populace to grind whole spices themselves and exactly how to do it. Well, not EXACTLY...

There is actually mortar and pestle technique, and many Quebecers will be frustrated that their spices jump all over the place because their mortar is too small, or too light, or not coarse-edged enough. My mortar and pestle technique was first learned in Poh's Kitchen. The "best mortar and pestle" discussion gets going about 2'45" minutes into the episode, and the "technique" discussion is at 5'40":


What I basically learned from this episode is that if I ever want to marry into an Indonesian, Thai, or Malaysian family I'm going to have to work on my spice-grinding technique (Note how I did not write "grinding" technique. That would have been embarrassing). I need to relax my wrist and let the weight of the pestle do more of the work.

What else I learned from this episode was that fully smashed chilies are very hot, but bruised chilies are more subtle. Final important Thai cooking tip: heat fades in oil, so the ton of oil in the cooking makes the heat more manageable. I'll take the heat and cut the oil to the minimum, thanks.

Now if only these things would stick in my head, since I watched this episode in the early summer and I am still nowhere closer to marriage. Not that I was trying or anything. God...

The point of all this is that:

1) The Metro is good, but not great since it didn't tell Montrealers to toast their spices before grinding, but it did tell them to not buy pre-ground spices.

2) If I can't marry a Thai, maybe India will take me, since I've put my mortar and pestle skills to work a few times lately in Indian dahls (or dals).

"Dry" Moong Dal
Sookhi Moong Dal

I actually had moong dal in my cupboard! I bought it randomly, figuring I'd need it sometime for an Indian recipe. It actually worked. When does that ever work? You can find it at Indian/Pakistani/Bangladeshi grocers, so anywhere in Parc Ex or Pointe Ste-Charles (though it may not be labeled and you may need to have a hand conversation. Fortunately "moong dal" is still "moong dal" internationally. Just don't spell it for the person in the shop. That would be silly since the package may or may not be labeled in English. Well, maybe not silly. Do what you must and try not to feel like an embarrassed, culturally curious but under-educated Canadian. We all are, but just don't admit it. It's like academics never saying their sorry. For the love of God, why don't people apologize more. I don't mean walk around apologizing for every silly little thing, but if you can say excuse me when you bump into someone or "pardon", a better version in French, then surely people can admit they're wrong without admitting weakness. I digress...

1 cup (200g) moong dal (you can't really substitute other dals without changing the cooking time)
4 cups plus 1 tbsp plus 1 cup water
1 tsp coriander, ground
1 tsp cumin, ground
1/4 tsp ground turmeric (if you can find whole, by all means grind it)
1/8th-1/4 tsp. cayenne (I obviously tend toward the 1/4 tsp, but I understand that others may disagree)
2 tbsp oil (not olive. I used oil drained from my Indian jalapeno pickle...for extra heat, salt, and flavour)
1/2 tsp. salt (I used less because there was tons of salt in my pickled jalapenos already...actually, I think this time I forgot again and cursed myself for having made the same mistake twice - adding too much salt, as I did in my pickle in the first place)

For the Baghaar (the hot oil, spice mixture that seasons the dish just before serving):
1 tbsp ghee or oil (ghee is good for flavour, but you can't use butter even though ghee is just a clarified butter. You COULD use 1 tbsp butter and 1 tbsp oil so the butter doesn't burn, but an Indian person will not be impressed. You will not find yourself anytime soon. That is obviously your goal, I know...I just used 1 tbsp more of the chili oil from my Indian jalapenos pickle. More heat, more flavour, more salt...)
1/2 tsp cumin seeds
1 dried, red hot chili (optional, especially if you use a chili oil like I did)

All you do in a dal is cook the lentils and then season is with a baghaar (the spice mixture cooked briefly in oil) which gets poured over top. It's the simplest dish. This one adds an extra step of seasoning with more spices in advance, and you'll find the dish much easier to digest if you follow the lentil soaking procedure. It basically acts similarly to "raw" food dishes where you want to release enzymes that give your stomach more of a work-out than it needs.

Wash the dal is several changes of water. At first it may not seem that any cloudiness is coming out, but stir it gently with your fingers for a minute to get it to open up to you, like perfect basmati rice, but longer. Drain the rice, then pour 4 cups of water (or more. You don't really need to measure. It's not a big deal) over it in a large bowl and let it sit for 2 hours. Then drain it again. Let it sit in the colander to wait, or don't use quite as much water later after you add the dal to the pot. It should end up being not too dry, but definitely not mushy from over-cooking to evaporate excess water.

Now the recipe says to use pre-ground spices but that's ridiculous. Do it only if you are satisfied with mediocre flavour. Sometimes I too am satisfied with it, but where you're cooking with water, not broth, the dish needs all the help it can get. So I toasted the coriander and cumin instead in a frying pan over medium heat for just a few minutes until they had browned slightly, giving the pan a good shake from time to time, and then ground he spices in my too-small mortar and pestle using my pre-discussed poor technique and tight wrist. Coriander flew everywhere, those little buggers, but eventually I was happy with the texture of the grind. Not too coarse or you'll be biting into coriander seeds (not really fun...or easy to digest) but not too fine. You can also grind in a blender or food processor or coffee grinder, but these are very fine grinds. In this case it's okay, really since the original recipe calls for pre-ground spices)

Phew! Done. Now combine the ground coriander and cumin with the turmeric, cayenne and 1 tbsp water in a small bowl. Stir.

Put the first amount of oil (up to 2 tbsp. I usually skimp a little, but not much or the spices will burn. A good trick is the keep all the oil to one side of the pot and when add add the spices directly onto that area instead of letting the oil spread all over the pot and not be a thick enough layer to keep the spices from burning) in the pot and when hot add the spices and water from the bowl. Do this with a rubber spatula so you get everything out all at once.

Give the spices one quick stir in the corner of the pot with the oil and then add the drained dal. Stir to mix. Add the salt and 1 cup of water. Bring it to a boil and then cover the pot tightly (place a plate on top if you can/have to to keep the lid tight) and turn the heat to "very low" for 15 minutes. This is a bit tricky because every stove is different and you don't know the first time you make this what the perfect heat will be. You want the dal grains to be tender and most of the water to be absorbed. So after 15 minutes (no peeking beforehand) test some of the grains to see if they're tender. If there's an obvious layer of liquid still in the pot and the grains are tender, then turn up the heat, remove the cover and let it boil off a little. If there's too much water and the grains aren't tender, bring the pot to a boil again, put the cover back on, and reduce the heat to slightly less low than last time. Let cook 5 minutes and check. If still not tender, cook 5 more minutes, etc.

Take the cooked dal off the heat and leave covered, waiting to be spiced. Or place the cooked dal in a large serving bowl and do the next step fairly quickly. It won't cool down that fast, but my kitchen is frigid...

For the Bhagaan:


Put the ghee (or more oil) in a small frying pan and when it's hot put in the cumin seeds. 3 seconds later (love it) add the red chili if using and cook 3 more seconds (amazing). It's supposed to darken and puff up a little but well...don't cry if it doesn't. You're probably already not getting married at this point. So it's been a total of 6 seconds and now you can pour the whole contents of the frying pan over the hot dal. You can stir, or just leave the spices on top as a kind of garnish. Fried onions are a traditional garnish, and delicious, but a lighter option would be chopped coriander...or more pickled jalapenos...mmm...

Friday, November 26, 2010

Cupcake Camp Montreal 2010 Round-Up: On the Hunt for Dairy-Free Baked Goods


My personal challenge for cupcake camp Montreal 2010 was to hunt down all the dairy-free, vegan, and/or refined-sugar-free cupcakes. The idea was that this would keep me away from all the butter and cream that would make me sick for days, but allow me to enjoy the festivities (aka eat cupcakes and donate to worth causes). What a stupid idea at a cupcake event...

I thought this was possible because on the bakers' entry forms you had to say what was in your cupcakes. EVERY ingredient, I think, so I figured it'd be on display at the Camp. Easy to find dairy-free options, and there'd be tons, right? Because lactose-intolerance is so common and Montreal has this whole health-conscious movement and all...but nope, Montrealers love their buttery, creamy cupcakes. And they also apparently hate labeling things.

First of all you have to understand that the Cupcake Camp was crazy. There were lines around the block, it was cold outside waiting to get in for a good 25 minutes, you couldn't move once you got inside, and you had to push your way to the tables. So much for the kindness of strangers. All is fair in love and cupcakes. And I do love cupcakes.


This is how it happened:
1:30pm - start waiting in cupcake line. No not a line of cupcakes - a line of people. A line of cupcakes would have been much more fun.

1:45pm - starting to lose feeling in my toes, and starting to jump a little to stay warm. Added bonus of burning calories to be replaced by cupcakes.
2:00pm - Wading through the madness, I started asking people if there were any dairy-free, vegan, or gluten-free cupcakes around (anything catering to allergies might have some different options in the general area).

"Down that way," one of the vendors said with a vague point. So I headed off "that way", and found someone else to ask.

Next unhelpful vendor:

"Back there - in the back of the room." He pointed where I had come from. So I sighed and trudged back. Maybe I should have jumped less outside in the cold and saved some energy for cupcake hunting.


Third person: "There aren't around here that I've seen...but I think maybe down that way," she said pointing to the left. I paused...Then I argued.
"But someone said there were some down this way!" Maybe the exclamation mark makes me sound mean, but that's how I said it. I was surrounded by 20,000 cupcakes and I was getting angry. That's not right. Surrounded with that much sugar I should have been on cloud 9. Sure, I could have given up and eaten some of the pretty flower-decorated options, but I could also give up all my life choices and eat a lot of pig too, and I'm not about to do that either. Buttercream was everywhere, red velvet is super popular, chocolate, vanilla, lemon curd, meringues, lime, daiquiris, apple caramel, oreos, smores, ganache on top of ganache, white chocolate, peanut butter, pistachio, cheesecake, dark chocolate, squash...but no! I came for dairy-free! And I'm ridiculously stubborn. So I pushed my way to the front of the tables - very stealth-like with my large empty box of cupcakes - and wound my way around both of the huge rectangles of cupcakes. I pushed and I yoga-ed myself over kids, under boxes being held in the air above heads, limbo-ed arms outstretched for cupcake deliveries, and even managed to avoid getting frosting in my frazzled hair. I went all the way around until I found one chocolate dairy-free cupcake with dairy-free frosting. No ingredients listed. Who knows what was actually in it, but it was wasn't milk, so I took it rather than be completely foiled. Vegetable shortening? Soy?
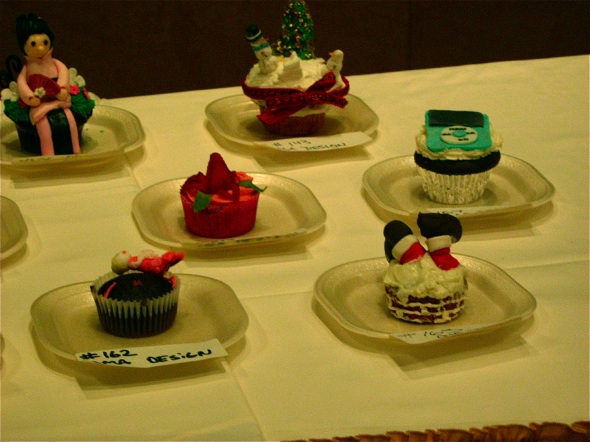
Some of the amateur design finalists - my favourite was Santa on the right...then the strawberry flower in the middle. I don't think either won. Some people just love fondant, alas. That's not a cupcake...that's just sculpting with debatably edible plaster...
Well, that was one. There was no way I was going to find 6 more...but I set off again with my box a little less empty and my spirits a little lifted.

3:00pm-ish: I found a gluten-free one. I don't know what kind of flour it was, and it probably had dairy in it, but it was looking like it was the best I could do, so I took it.


3:15: Then I found sponge cake cupcakes with lime meringue. Sponge often doesn't have dairy, and meringue definitely doesn't, so I figured there'd at least be LESS dairy in them. Then I found another two dairy-free! How had I missed them? Right, because it was a zoo in there. These were listed as having soy in the cake and frosting, and they tasted dry and bland (it was yet another generic chocolate offering). Come on! Where were the skilled Montreal bakers making Alice in Wonderlands with almond milk?
 Where was the chocolate raspberry with apple sauce or prune puree? If Oscar the Grouch can be sculpted from fondant, the Olympic Stadium made with pearls and ribbons (see below), smoked salmon be topped with sesame bagel, and Santa Clause's feet can stick out upside-down from a circular fireplace cupcake (see above), then SURELY someone could make a selection of delicious dairy-free options. SURELY!

Kids were making cupcake aquariums for goodness sake. Amateurs were making Mario and Luigis and sushi platters of cupcakes. Pros were sculpting in gold flakes and lace. And yet, I ended up finding a grand total of 5 "alternative" cupcakes (without dairy, or gluten, or eggs, or with raw sugar).
3:45-ish: So my plan went horribly awry. Completely frustrated, I then went and chose the prettiest dairy-stuffed creations I could and tried them all out of bitterness (mine, not theirs, though one with a dark chocolate truffle inside was a bit surprising). Dulche de leche, and even sorbet by Bilboquet topped with their vanilla ice cream. My head was pounding from caffeinated coffee fumes from three of the city's best espresso shops (Neve, Myriade, and Nespresso). Myriade even had cupcakes from Le Chien Fumant and I chose the dark chocolate one because I've heard their patissier is very good. It was nice and simple. The pound-like cake was pretty good, and the chocolate seemed a little nutella-y nutty, but it just couldn't stand up to the strong flavours I'd just tried. My mouth was on sugar overload. The apple caramel overpowered even the lemon options (except the curd, which could have punched through Rocky Balboa). My favourites were the ones that were cakes, filled with something and topped with something, like "For the Love of Cake" in Toronto. I stayed away from the bacon options.
 4:00-ish - I sat down and ate. The organizers were asking people who had completed their purchases to leave so more people could come in, but I had just run around a zoo of cupcakes for 2 hours being a little over-tired, and under-cupcaked and there was no way I was leaving before the winners of the Best Montreal cupcake, best professional design and taste, and best amateur design and taste were announced.
 The most innovative cupcake I tried? A chocolate base, then a layer of vanilla with lemon zest on a thick, thick, thick slightly lemon buttercream icing, garnished with a slice of beet confit (in the middle-right of this picture with the red circle sticking in the top). Beet confit! The rest of the cupcake was good and offered lots of variety, so when you got sick of one flavour there was suddenly another to enjoy, which is important when you get bored easily, like my tongue, but the beet! The beet! It tasted like candy. No bitterness, but just sweet enough. Not too sweet even. It was perfect with the lemon. It was from a student from the Centre de Formation Professionel Jacques-Rousseau. I went back to tell him I loved his cupcake but he had gone. I wouldn't have wanted to stay in that madhouse longer than necessary either.
 
The other highlight of the event was seeing local food celebrities. Everything got better when Chuck Hughes left, I'm sorry to say, since his fanclub cleared out. I also managed to get to front where the judges sat and when no one was looking I may or may not have stolen Nadia G's gift bag when no one was looking...imported smoked mullet, Italian olive oil, and Italian dried pasta. Nothing local? So I gave it back.

I'll get my own mullet, thanks. If bacon can go on a cupcake...hmm...smoked fish cupcake?Well, the oyster cupcake won the #failcake and that was pretty stupid. I mean, come on, you take an oyster and you take a cupcake. Real difficult...I would have given it to the person with tuna actually IN the cupcake. At least that took some skill. They even made poor Nonna Maria (well the voice thereof) eat the thing. God knows when it was shucked. I hope he went and threw up afterward for his own sake...Stupid crowd cheering him on to do it. How much wasabi, horseradish, and soy sauce would he need to make that okay? I guess people eat tons of not great sushi and don't get sick. Iron stomachs, I tell you.

To sum up,
Things I learned:

1. Manners go out the window when cupcakes are involved
2. Christmas present options for any and all cupcake-making Montrealers this year include a label-er (mark those cupcakes!!) and a map since they suck at giving directions.
3. I'm going to have to make my own cupcakes if I don't want to ingest a pound of buttercream when I'm craving sweets. I'm thinking caramel dulche de leche with almond milk, with maybe a pear base to make it moist, and/or a date-sweetened chocolate poundcake-type cupcake filled with fig jam, and topped with diced figs softened in cassis honeywine in a thick probiotic yogurt icing...like an alcoholic crème fraiche.


Thursday, November 25, 2010

Dates, Leopoldo, and Tania

The final Jean-Talon fruit vendor test was dates. Medjool, not dinner and drinks. In fact, I've had worse dinners than these dates before. I won't get into it, but trust me, sometimes you're better off with medjools.

Now, I've gotten picky with my dates recently (lets focus on fruit, please...); there are Iranian ones that taste like candy, with a richness and fruitiness to the cough syrup taste. Kind of like they're on the edge of fermentation.

Then there are Tunisians. They taste like honey when they're perfectly ripe, and biting into the bottom of them should cause their syrup to stream into your mouth. Then you chew the soft, baklava-like flesh up to the harder top. But this is between my fruit guys, Leopoldo and Tania.

But the Tunisians are just better! They're the ones that I'm not sure where they come from (probably somewhere in the Middle East) and they come in those big red boxes with a plastic window in the front, and you can pick out a few when you want them. I'm sure that the three places I favour when buying these dates all get them from the exact same place. It just all depends on the turnover of the bulk store and the freshness of the dates. Oh, and how they're stored. They dry up easily, but they can get kind of over-ripe in humidity. So keeping them at their optimal juiciness for more than a few days in a Montreal winter is tricky.

Leopoldo and Tania at Jean-Talon market (my competing fruit vendors who don't know it) both sell their dates for 8.99/kg (I think it's kg. I always forget). It's pretty expensive, but these dates are huge. Where I could eat a lot of the smaller honey-filled Tunisians, I can eat significantly fewer of the enormous medjools. I don't want to know what they're sprayed with, but that's probably what sucks the flavour out of them. That's the thing, see, they're not actually that delicious, just sweet. But the texture! When they're soft they're just chewy enough to feel sticky and smooth, but one day in a fridge or in the cold and you're working too hard to chew or adding liquid to make it fresh. They're the perfect thing to eat when you need a boost of energy that won't result in a crash 20 minutes later.

Back to my men: Leopoldo's looked good one day and I bought a few to try. They were okay. A bit dry. I figured most date-buyers wouldn't purchase their dates here at Leopoldo's since he's generally not a Middle East specialist. Italian, South African, American - yes. Then when I was at Tania's buying fennel I saw the dates at the cash register. They were obviously juicy and perfect and I bought some and oh...so good. Except, as usual, no real flavour. No honey, no fruit - just sugar. and sugar's not bad. So they're perfect for baking without refined sugar, but not so perfect for snacking if you're looking for flavour.

That's why I have to go with the Tunisians and toss my men to the wayside. Overrated, men. They all tasted a little different from each other (the dates, not the men, not that I've tried them all or anything, the dates...geez, complicated) - like 5 or so different kinds of honey - strong buckwheat, mild clover, a little bit of blueberry maybe - in one $5 box (did I mention you get 1 kg for $5 at the Tunisian place next to Leopoldo's?). Not that I'm a cheap date...I'm hilarious, I know.

My point is, maybe I'm imagining things, but some just taste different.

My other point is that if fennel, persimmons, and grapes all came from Tunisia and were sold at the Tunisian place next to Leopoldo's, that's where I'd buy them. He'd be my fruit guy, but for now I'm pretty happy with straight sugar and Tania. Sorry Leopoldo. When I want a bit of sarcasm and I'm sick of being treated too well, I'll come crawling back.

Wednesday, November 24, 2010

Competition #3 Between Leopoldo and the Man With Whom I'm Cheating on Him

...and there there's fennel. It's clear I'm obsessed with this vegetable, and as disappointed as I've been with my fruit guy, Leopoldo, the last few times I've bought it, I decided it was time to try again. But the definition of insanity is doing the same thing over and over and expecting different results. Some people call this empirical science, but no, it's insanity.

So, I chose to go with my second fruit guy and hope his fennel was different...and that I was not crazy. That's important.

I got the same deal on 3 fennel bulbs (for $5) at Tania Fruits - my new fruit guy. I'd been advised by someone which much more kitchen experience than myself to blanch the fennel before roasting them, but that only seemed to make it roast a little faster. It didn't make it any less watery. At least it didn't char as much, but it all kind of melted to fennel mush. Apparently the blanching also keeps it from discolouring, but it was just me eating it, so what did I care about colour?

I did everything else the same: coated the blanched fennel in oil from my pickled Indian jalapenos (amazing! salt, oil, heat) and roasted at 400-ish for 15 minutes, turned the fennel, and roasted another few minutes until they were tender. The elusive "tender-crisp" never appeared. Now I'm blaming my baking sheets. I've tried different sheets and casserole dishes and still nothing is working. I sprinkled the fennel with lemon once it had roasted, and that was lovely, at least, but it was basically chewy soup.

Alas, fennel and I are still working things out. Much like my fruit men. Except they don't know about my tests. I swear I don't usually play games, but choosing the right fruit guy is important in my life.

One more test to go before I stop being such a floozy: Dates, ironically.

Tuesday, November 23, 2010

Fruit Vendor Throwdown: Dancing, My First Persimmon and Knowing That Something's Missing

Have you ever had an experience where it ends and all you think is "Huh...That's it?"

Yeah, that's kind of how I felt with persimmons, except, well, it wasn't really a disappointed "that's it". Some people can take things so seriously. Sometimes all you're saying is simply, "that's it?" and it doesn't mean that what you just experienced was bad, just that there could be more (quantity) or it just could have been better (quality). With persimmons, even though it was my first time, I knew this was not the ultimate persimmon flavour. Call it fruit intuition. It wasn't fresh off the tree. It wasn't local. It'd been picked in advance to ripen during transport. Its skin was tough to make it through the long drive. It was just sweet and mild, but I wanted intoxication. I wanted to feel as though the world had slid itself out from under my foot and I'd gone tumbling into a gravity-less void. I wanted sharp acidity mixed with honey-like (not sugar-like) sweetness.

The one thing that was perfect was the texture. There were two kinds of persimmons at my fruit shop and there were three ways I was instructed to eat them:

I follow directions well. Where fruit vendors lead, I will follow. Like a dance. So Leopoldo (whose name is not Leopoldo) told me to eat the smaller ones like an apple, I could eat them right away, and they'd be just a little crunchy. Then let a few more of them ripen a few days on the counter and they'd be soft and mushier, more like a mini-explosion of juice. The larger ones, he said, needed 2-3 days on my counter before they were ready. They should become soft and seem like a single puncture wound would be the end of them. Then I could bite into them and all the juices would seep out. Well I waited 2 days and I tried one. It was still a bit tough, but the very bottom was heaven. The top created a strange starchy coating around my gums and seemed under-ripe, so I figured the trick would be to wait another day or so. The next day the next persimmon was better and the fruit was half mushy and half thicker, soft pieces. These sections of fruit stayed together inside the mush and made for exquisite chewing. One persimmon was perfect with cereal because the juice gave the liquid the cereal needed, and the fruit sections gave the soft chew, so it was like two fruit in one (kind of like milk and strawberries - not taste-wise, just combination-wise).

I bought another 8 persimmons from my second fruit guy to compare. The grapes had been better, so maybe the persimmons would be too. Nope, they were exactly the same.

But then I ran out of soft ones and it got so cold that nothing was ripening in my kitchen, so I'm sitting around waiting for them to ripen and they never will. I've just been told that I should stir-fry them up with green beans, spinach or some other vegetable and since they're kind of tough like I apples I think this might work. My two fruit vendors are locked in a tie, for now.

Next trial: fennel.

Sunday, November 21, 2010

Cheating on My Fruit Guy

The world is letting me down. First my "free Gazette man" and now my fruit guy. Good thing I still have Guillaume. Loyal Guillaume with his incredible sourdough and his yeast that smells like strawberry jam-filled donuts. I swear.

This is not about Guillaume. This is about Leopoldo. Leopoldo even caught me cheating on him, but I would never cheat on Guillaume. I'm a little scared to go back and face up to my indescretion. I don't think he'll ever offer me his best fruit again. Or make me a deal on mangoes. Good thing it'll be awhile before he gets good mangoes in, I guess...

The worst part is I cheated on Leopoldo with his neighbour whose name I don't even know. Shameful. The two men seemed to be offering me the same things: consistency, comfort, and persimmons.

Oh, and moscato grapes, fennel and dates (medjool. Not the most fun kind, but pretty exciting sometimes).

Then I realized I don't even know the guy from Leopoldo's actual name, since he isn't even Leopoldo himself! Leopoldo is like 60 or 70 or something and rarely even enters his own fruit shop anymore. My crudgety yet lovable salesman must have a different name, and he never told me what it was. So much for trust.

I'd like to say I was drunk and can't be held responsible for my actions, but all I had in my system at the time was one moscato Italian wine grape. Before fermentation.

So why'd I cheat? Leopoldo's neighbour offered me a grape. I didn't pay much attention because I'd had one at Leopoldo's before, but this was completely different. It tasted like wine - sweet without the acidity. I've never had a grape like this before. All the flavour without the alcohol! To some this is a good thing, to others it's less so.

What makes the grapes special is that they're grown on hills and the elevation is what gives them their flavour (along with the added sweetness from the lateness of the season and the concentration of the sugars. Late harvest wines often taste like quasi-dessert wines from sweetening on the vines).

I bought three bunches and my new beau asked if I was going to share with friends. I lied and said yes. A great way to start a relationship. Instead, I ate a bunch and froze the rest, as Josée di Stasio taught me. This concentrates the sugars even more. It was hard to put these beautiful grapes in the freezer, but leaving them in the fridge wasn't making them any more delicious. Eating fruit fresh when it's perfectly ripe is divine...

...which brings me back to persimmons...

Saturday, November 20, 2010

Pissaladière: "A la di Stadio"

This wasn't your fault, Josée.

If I could only follow a recipe properly this would have been fine, delicious even, but you asked for 2 lbs of onions and I only had 1 and a pound of leeks. And apparently leeks take a whole lot longer to soften than I thought, even when they look ready for the next step. I didn't even try one to make sure. Ultimate mistake. Honestly, I had to do was not under-cook them and this is the easiest recipe in the world. My canned (home-canned, so they taste like summer, not factory) couldn't even save this pissaladière.

So for anyone else who aspires to di Stasio greatness, here's how to make this dish properly:

1 tbsp olive oil heated over medium heat
2 pounds onions (you can use leeks but they MUST be softened to an onion-like consistency), cut in slivers
4 tomatoes, peeled, seeded and chopped
Some thyme
1 glove of garlic, finely chopped
salt and pepper

Add the leeks to the hot oil and cook about 5 minutes, then add the rest of the onions since I think they'll cook faster. Cook, and cook, and cook, and then when you think they're done, TASTE them, for the love of God taste them. If you have to chew and crunch they're not done. 20 minutes minimum. Just suck it up and wait. If the leeks and onions start to burn turn down the heat or add a tiny, tiny bit of water. You don't want to steam the onions and leeks, but better slightly steamed than slightly burned. You can also use 2 tbsp at the beginning instead of one if you must, OR do this in 2 batches because I think another potential downfall of my own was that the pan was not big enough. I'm thinking ENORMOUS frying pan next time.

Finally, when you can't wait any longer and the leeks are edible add the 4 seeded, peeled and chopped tomatoes, some fresh thyme or some dried (a small sprinkle, a big sprinkle, as you wish), some minced garlic (about 1 clove), and salt and pepper. Cook 5 minutes more. There shouldn't be a lot of liquid from the tomatoes, but you also don't need to drain them or anything. The juice will help deglaze the leeks and onions.

Preheat the oven to 350 Fahrenheit.

Now pour the whole thing on top of pizza dough or a flatbread dough (pita bread works too. I had a roti that I stretched out to pizza-like thinness. At least that worked...well...). Don't forget to oil the dish before you put the pizza dough/bread dough in or you'll never get to eat that dough. Mine got stuck and I scraped and I scraped and it never got eaten. Such a waste.

Into the oven for 25 minutes, or until you figure it's done and the sides of the dough haven't burned. You can also brush the top of the leek/onion mixture with olive oil so it browns a little, but that only helps if you didn't mess up the onion frying. Such a novice mistake. Optionally top with anchovies, olives or red pepper strips (preferably roasted, though the 25 minutes will go a long way toward roasting them) before popping in the oven. The salt from the olives collapses into the leeks, so at least it's properly seasoned.

I'm such a bad Quebecer. Messing up pissaladière...

Friday, November 19, 2010

The Downfall of the "Free Gazette Man"?

Of late, there has been something wrong with my "Free Gazette Man".

It had gotten to the point where I walked to the metro in eager anticipation of an ingenious sales pitch. Some days I even WANTED to read the Gazette (Well, mostly Wednesdays when the food and life section comes out...and the free gazette man doesn't work on Saturdays).

But this year that I didn't even dress up for Hallowe'en! Why? Basically this brilliant man who tells me to clean my windows, give educational gifts to friends, and convinces me to dress up as a newspaper for Hallowe'en seems to be a little depressed and angry. Yes, the weather is a little chillier and I wouldn't want to be outside for half the day either, but once I slightly reached out my hand for a newspaper and he thought I was waving him off, and he scowled. He scowled! Another time he thrust the newspaper out in front of me angrily and I was so taken aback that I moved out of the line of fire and didn't take the newspaper I'd been thinking about taking for the last 2 minutes. Now I'm a little scared to go to the metro. It's as if I've offended him (well, maybe more so as if "people" have offended him since he doesn't know who I am) and I'm doing my traditional conflict avoidance thing. It's good for getting me on my bike and off the metro, but soon I'm going to have to see this man more often as the weather gets less bike-friendly, and I'm a little nervous.

What if I miss a great recipe or a great food article because I chose not to take the Gazette just to avoid a mini-confrontation with this man? The way I see it, I have two options:

1. I can be a little stealth, and take a newspaper from the stack by the doors instead of taking one directly from him. It's not as though he works on commission or anything.

2. I can remember to read the paper online instead, but then this slightly angry man is stuck outside a little longer each day, waiting for all his newspapers to be taken. Maybe at 5pm he just leaves the extras and goes home. Does he get fired if they don't all get handed out? I don't want him to get fired...I just want him to stop scowling at me.

So, what to do, what to do?

Here's the best idea I can come up with:

I'll avoid him when I see him, my Gazette Man, and then when I see an unguarded stack by the door I'll take 3 or more to make up for the days when I don't take one. It's a horrible waste and completely negates the point of handing the newspaper out for free, but he wouldn't care, I wouldn't care, and we both get to our destinations a little happier, maybe (me to the metro, him to his home).

Yes?

Wednesday, November 17, 2010

"Raw" Granola: Dried Apricot, Almonds, Sunflower Seeds, Sprouted Oat Groats Sweetened with Date Paste


This recipe sprouts for 1 day, soaks for one hour, takes 30 minutes to prep and then 2/3rds of another day to dehydrate. Why would anyone got to the trouble of making this? Well, I'm a sucker for recipes that end with the instruction to "enjoy", and I suck at "real" (sugar high-inducing) granola (see efforts 1 and 2). So I figured a raw one might work for me better. Besides, it's SO much better for you (and me). But I'll admit, some of it became beautiful granola clusters and some just didn't, and by the time I ate my way through 3/4 of it I decided to take the rest and kill its raw food goodness by sticking it on the stove with some water and turning it into oatmeal-like hot comfort food. I'll never be raw. I'm okay with that. In fact, I'm ecstatic.

1 cup oat groats (a bit weird, but I don't get along with buckwheat and these are less processed than flaked oats)

1 cup medjool dates (soaked for at least 1 hour in 1 cup water if they're not that soft. Medjools are the big ones that taste only halfway like cough syrup. Tunisian dates are better since they're more honey-like, but you'll need more of them. Iranian dates have a bit of a fruitier taste to them which would work, but might be too much for the recipe. Use what you have...just not regular, pitted dried out dates that should only ever be used for your Grandmother's disgusting date squares. Don't get me wrong, I love date squares! Just not those)
1/4 cup sunflower seeds
1/2 cup almonds
1 tsp cinnamon
1/4 tsp. nutmeg
1/4 tsp. ginger
1/2 vanilla bean

1) 2 days before you want to eat raw granola soak the sunflower seeds in a bowl of cold water and place in the fridge overnight. Do the same with the almonds and another bowl, and do the same with the oat groats and another bowl. Or you can do like many raw foodists do and soak your nuts the day you purchase them, then the next day dehydrate them on a baking sheet in the oven at the lowest possible temperature with the door left slightly ajar (takes about half a day if you remember to turn them over halfway), then freeze them for later use. Enzyme-inhibiting-free nuts at your service.

2) In the morning soak the dates in just enough water to cover for 1 hour. (Skip this step if they're soft)
3) Drain the dates and reserve the soak water in a small saucepan. Bring the water to a boil and add the vanilla bean. Reduce heat to a simmer (you can also add fresh ginger here instead of or in addition to the powdered ginger later). Simmer the bean for at least five minutes. The longer, the better. 
4) Pour the liquid into the blender and remove the vanilla bean and ginger. Wash the vanilla bean and leave it somewhere to dry. You can re-use it if you store it in an air-tight container once it's dry.
5) Blend dates, cinnamon, nutmeg, and powdered ginger along with the vanilla-infused liquid. 
6) Drain the sunflower seeds, almonds, and oat groats and rinse under cold water. Spread evenly on 2 large baking sheets.
7) Pour date mixture over oats and seeds and stir to combine.
8) In a real dehydrator you could just dehydrate this at 115 degrees for 16 hours and it'll get beautifully crispy and granola-like. the oven won't get you to that state of granola perfection, but it's not bad. Stick the trays in the oven on the lowest possible temperature with the door slightly ajar for about half a day and stir periodically. Rotate the pans around so the granola dehydrates sort of evenly. When you're happy with the crunchiness of it, it's done. If you pre-soaked and dehydrated your nuts they may want to burn on you, so be careful. Even at this low a temperature your seeds can go from flavourful to dead pretty easily.
5) And, as always, enjoy!


Horribly Misshapen but Still Delicious Roti Chanai

Ever had someone tell you that Jesus loves all the little children, even the ugly ones?

All childhood scarring aside, that's how I feel about this roti. I kneaded and put all my love into it, and then Montreal's environment and my horribly cold hands didn't get along with the gluten in the dough. So it didn't stretch properly...no matter (you're actually supposed to throw it against the counter-ytop to stretch it...there's a technique - and video instructions), I just took it and stretched it by hand, and so instead of having beautiful cracked layers after folding it over itself twice, I had a single, thick layer of doughy goodness. Wrap it around some eggplant, some fennel, some sambhar, some dahl, some squash - the options are endless - and you almost forget about how poorly you (I) made it. Until the squash starts oozing out of the holes in the dough. Ah well, that's the fun of it.

The recipe is from my favourite cooking podcast/show, Poh's Kitchen. I'm a little in love with Emmanuel, the adorable Frenchman, but this Kuala Lumpur Chef is also pretty good. He teaches Poh how to throw roti which, in my opinion, makes him a hero. I am not as good a good pupil as Poh, but the chef did not make my dough for me either...

Ingredients:
makes makes 8-10 roti
500g plain flour (best to weigh, because this isn't exactly 2 cups. I used whole wheat because I realized as I started that that was all I had. Probably affected my throwing ability for the worse...)
1 tsp salt
1 tsp sugar
1 cup water
2 tbsp condensed milk (I use very evaporated almond milk. It theory it should be the same consistency, but really it isn't. Maybe that's why it didn't work out perfectly for me...but that's just an excuse)
2 tbsp margarine (or oil), at room temperature
1/2 egg, lightly whisked
Extra margarine
Extra vegetable oil
1. Combine flour, salt and sugar in a large mixing bowl. Make a well at the centre of the dry ingredients and into it, pour the water, condensed milk, margarine and egg. 
2. Work in a circular motion with your hand, gradually gathering more and more of the flour into the wet ingredients until you more or less have a single mass. 
3. Tip all the ingredients onto the bench and knead until smooth and elastic (ambiguous elasticity terms don't help me very much, Poh...). Roll into a cylinder and divide the dough into ten pieces. Knead each piece a few times to achieve a smooth texture, then shape into a ball. Gently cover each ball with margarine and rest in a bowl alongside but not on top of another. Cover with plastic wrap and allow to rest in room temperature, overnight.
4. After the overnight resting you will find the dough soft and stretchy (um...it was pretty stretchy). Now the fun part begins. Start by oiling a substantial area of the bench liberally. Place one of the balls of dough onto the table and press down with the palm of your hand while moving it in a circular motion. This is just to flatten and smooth out the surface of the dough as much as possible before you stretch it. It takes a bit of practice to throw the roti the professional way and while it's definitely quicker, an equally effective method is to work around the edges of the circle of dough, gently stretching the edges outwards as far and as thinly as you can (so it's like tracing paper and about 60 to 70 centimetres in diameter), and before holes start to appear (best to follow the video instructions but expect to fail...at least if you're me)
5. Fold a third of the way in on either side of the circle, so you have three layers of roti on top of each other, then fold this elongated shape into thirds again, so you end up with a squarish shaped roti. Heat up your frypan on high heat with a dash of vegetable oil and pan-fry the roti until golden blisters appear on both sides. Let it cook 3-4 minutes. If it takes longer your pan isn't hot enough. Mine always seemed to take longer, and they were so thick I felt that I had to turn them over, but I liked them crisper this way. I tried the smashing thing below once and it kind of squished in a little and then came back out as if nothing had happened. Kind of like yelling at someone and getting no reaction. It's really unsatisfying. Not that I yell at a ton of people or anything.

When cooked, immediately slide the roti onto a chopping board, wrap your palms around the edges and smash your hands together so the roti bunches up and flakes. Rotate the roti and do this several times while it is still hot. Yeah, that didn't work for me...it was still delicious. Serve immediately.

Tip: Before each fold, gently smear a small dollop (about a quarter of a teaspoon) of margarine onto the roti. This will prevent the layers from sticking and help the roti cook more evenly. (For this to matter, you're going to need to throw it properly. I figured that since it didn't stretch properly and tons of holes appeared it wouldn't matter if I folded the gnarled ends over without a little more margarine. I suppose that's giving up, but no one at my kitchen table minded. Go figure. Maybe I'll invite more than just myself to dinner next time...).

Tuesday, November 16, 2010

Pickled Carrots

Basically, I had leftover brine from making the pickled jalapenos, so I chopped up some carrots and pickled them too. No point letting brine go to waste. That's honestly all this is. Always sterilize a few too many jars than you think you'll need, in case something like this happens and you can pickle something else. Can't wait to open these guys soon...so much sugar. STORE IN FRIDGE! Eat within a month and a half, I think...

Saturday, November 13, 2010

Pickled Jalapeno Peppers

I actually feel bad writing this now because I haven't eaten these yet. They're sitting in my fridge (because I'm paranoid about my cupboard since there was no water bath afterward) waiting for me to decide they're ready (Apparently it only takes a week, and these only last a few months, so the window of opportunity is small for so many jalapenos). They're also waiting for me to finish eating my pickled red chilies, my Sriracha chili sauce, and my most recent Indian pickled jalapenos. Why open yet another beautiful pickle when I'm not ready for it and its life becomes shortened by letting it breathe? That would feel awfully gluttonous, well, as far as brine-pickled jalapenos can be considered gluttonous. I mean, come on, it's not as if there's a pound of butter and cream in there; the chilies aren't going to go to my waist.

Take a second here to picture that...chilies going to your waist. Someone could then nibble my waist and their mouth would burn. It would be a sign...whether they liked chilies or not would be an important moment. Nevermind why that person would be nibbling my waist in the first place. One of these days I'll learn to be a romantic and less...unique (I hate the word "weird"). Maybe.

One quick note on the recipe: It comes from David Lebovitz via Michael Ruhlman and Michael Symon, three food writing greats. The last paragraph of Lebovitz's intro to the recipe made me stop for a second and think about life...

He says he keeps Ruhlman and Symon's book on his bedside table to read at night,
"kinda like “normal” people make, say…fiction or biographies their bedside reading. Or keep their refrigerator stocked with things like milk, vegetables, eggs, and other necessities…instead of cramming it full of pickles."
Yup, you should see my fridge, David. I completely understand. It's ridiculous. My roommate is silently fuming that there's no room for his food because there are jars everywhere - labled yet mysterious jars filled with strange things. One by one they disappear, only to be replaced by my next pickled concoction...

Pickled Jalapeños
Adapted from Live to Cook by Michael Symon and Michael Ruhlman

1 pound (450g) fresh jalapeno peppers, washed
2 1/2 cups (625ml) water
2 1/2 cups (625ml) vinegar
3 tablespoons sugar
3 tablespoons coarse salt, such as kosher
2 bay leaves
2 tablespoons whole coriander seeds
3 cloves garlic, peeled
2 tablespoons black peppercorns
1. Sterilize a bunch of jars (estimate: five 250mL jars) and rings. Wash them with the lids in hot, soapy water, and the put the rings and jars in the oven at 220 degrees Fahrenheit for 20 minutes. Or put them in water covered by 2 inches, bring the water to a boil, and boil 20 minutes. The oven is less of a hassle.
2. Stab each pepper three times with a sharp paring knife and place them in the sterilized jars (use tongs to move the jars around and take them out of the oven, and use chopsticks to stick the jalapenos in the jars. I removed the stems because they take up valuable space, and I think I even stripped out the seeds. That was such a long jalapeno seed-stripping day. You should skip that step and just cut off the tops)
3. In a non-reactive saucepan, bring the other ingredients to a boil, then reduce the heat and simmer for five minutes.
          4. Bring a small pot to a simmer and then reduce the heat to very low. Add the jar lids for 5 minutes or until you're ready for them.

          5. Remove the brine from the heat and pour over the peppers in their jars. Push the peppers down with the chopsticks to make sure you get any air bubbled out and squish the chilies in as much as possible. Wipe the rims down with clean paper towels (no touching with fingers!). Place the lid on the jars, twist on the rings and let cool. Once cool, refrigerate for at least a week before using, if possible. (You can use them sooner, but Michael says they’re worth the wait. If Michael says, then who am I to argue? So I wait. Thank goodness I learned patience with ginger confit, but that was just 5 days.)

Now the things is, as I said, these only last a few weeks! So I have a lot of pickles to get through and some friends to make with some timely gifts. Any takers? Otherwise they're going straight to my hips.

Friday, November 12, 2010

Indian Jalapeno Chili Pepper Pickle and My Addiction to Heat

Absolutely amazing. I can't believe I almost didn't make this recipe. I spent about an hour looking for the perfect pickled jalapeno recipe and I chose two -- this one and a standard vinegar-brine chili pepper recipe. But this one...I have no words.Basically my first bite of this was up there with some of the best restaurant experiences of my life (butterfish with wakatake sake at Ame, tagliatelle at Enoteca Sociale, marrow at Aix Cuisine du Terroir. That's all I can think of) and the best recipes I've ever made (2 day marinated almond poppy seed lamb with figs. That's the only recipe. Oh, and perfectly in-season ataulfo mangoes. The eggplant dish is pretty amazing, but has nothing on this pickle).

Now I know not everyone is as obsessed with heat as I am, but this stuff is addictive. It took me FOREVER because I took out the seeds of the peppers (I'm really not into just heat, I'm into heat and flavour when combined with heat, and the seeds are just ungodly hot), but I am so happy now. Yes, chili peppers create endorphins, so maybe I ate so much of this that I pickled myself happy?
It looks gross, yes, but Indian food in general looks like a stewed mess and only Vikram Vij's team at his Vancouver restaurant tried to make it beautiful. Everyone else who cooks it just eats it, closes their eyes, and dies of happiness. The reason I love this so much may have something to do with the fact that I halved the recipe but forgot to cut the salt in half too...

Or it could have something to do with the 1/2 cup of oil, but I doubt it because the oil doesn't actually add any flavour. Since it was a canning recipe, though, I didn't skimp.

Indian Pickled Jalapeno Peppers
1 lb fresh green chilies (you can use green or red and any type or size you want, but the heat and flavour of the pickle will vary greatly
1/4 cup vinegar
1 tbsp garlic, chopped roughly (it gets blended)
250 ml mustard oil (about 1 cup. I used sunflower oil, but mustard oil will be better and bitter)
1/2 tbsp fenugreek seeds
1/2 tbsp ground turmeric
1 tsp nigella seeds (black cumin seeds)
1 tbsp black mustard seeds (a little extra if you don't use mustard oil. It doesn't really make up for it at all, but it can't hurt)
1 tsp crushed asafoetida (I've only ever seen it in chunks at Indian or specialty spice stores, and then you need to grate it. It smells like onion and garlic together, so don't make this and then plan to hold hands with someone you like all night. If you don't like 'em, grate away)
1 tbsp salt (1! Not 2! Geez...)

Directions: This is a 2-3 day process. I'm sorry, but just do it once, and then yell at me if you still want to.

Wash and dry the chilies.

Cut off stalks and slice chillies across into 1 cm (1/2 inch) slices. Give yourself a good hour to to do this. Invite a friend over to help, one who doesn't plan to put in his or her contacts later that night. Done that a few too many times. Wasted a lot of contacts that way...hurt a lot of eyes that way...well, two.

Sprinkle with salt and turmeric, toss to mix evenly, cover and leave for 2 days in the sun or place in a very low oven for 2 hours each day. (2 days! Ridiculous! But I did it. Even turned the oven on as directed.)

1 day in advance, soak the mustard seeds in vinegar overnight, then grind in an electric blender with the garlic when you're ready to start cooking.

Sterilize about four 250mL jars and lids (it's better to do 7 or 8 125mL jars if you have them, because this pickle is precious). So wash the jars, lids and rims in hot soapy water. Then stick the jars and rims in the oven for 20 minutes at 220 Fahrenheit. Then just leave them in the oven until you're ready for them (remember to turn the oven off).

Get all the other ingredients ready in advance. No time to prep while you fry.

Heat oil in a large pan and add the fenugreek and nigella seeds.

Heat while stirring, until the fenugreek is golden brown (not long at all, just about 10-20 seconds or so), then add the asafoetida, stir, and add the blended mustard seeds and the chilies together with any liquid that is there. The salt will have sucked the water out of the chilies but for some reason you want to pour it all in. I think it makes the chilies a little more crunchy so they don't wilt in the cooking and get soggy in the pickle.

Cook, stirring now and then, until the oil rises to the top and the chillies are cooked but soft.The oil seemed to rise right away, but I think I cooked about 8 minutes??

Bring a small pot of water to a simmer, reduce the temperature, and add the lids for 5 minutes to soften the wax.

Put the hot pickle into the sterilized jars, put the lids on top, and tighten the rings (no hands, please). Tongs are wonderful things. So are pickles. Oh God, so are pickles.

I waited about a week before eating this and the first things that hit me was the salt, then the other savoury spices, then the heat, and it was the heat that lulled me into submission. I would have done whatever it wanted. Fortunately it can't talk, so I assumed all it wanted was for me to keep eating it...which I did.

Pickled Indian Chili Peppers Dripping in Luscious, Spicy Oil

Oh, I suppose I should tell you what you can eat this with. I've had it so far with squash, bread, eggplant, fennel, and roti, but it goes perfectly with anything that needs a kick and doesn't already have too much (or uncomplementary) seasoning of its own. So daals are good, or lentil soups, or noodles, or rice, or potato dishes (even buttery ones). Maybe even chilies or stews, but you won't know until you try. This is basically my all-purpose seasoning for the next while. Instead of salt, I will add salty, pickled jalapenos. Note: it does NOT go with hummus. DOES NOT!

Wednesday, November 10, 2010

Vanilla Bean Chestnut Purée


When I moved to Toronto from Newfoundland, one thing I couldn't take were all my mother's cookbooks from which I'd been cooking for a few years. It's part of moving out, I know, to start a collection of your own, but there's something beautiful about a book that you and your family have been using for years. The pages are a little worn, there are stains on the pages from fingers and from chocolate (or tomato, or fennel, as I discovered in my Indian cookbook this morning), and you've adjusted measurements to suit your tastes. Your experiences and memories are recorded in that book.

So starting over is hard and my collection in Montreal is still relatively small. Most of the books I have I don't even use - leftovers from when I started that my mother could bear to part with (Kids Cooking, 1001 low-fat recipes, mostly junk, really, but great ways to get started before I turned into a snob. If anyone reading this wants to make a pot of dirt and worms - chocolate soil and gummy worms - let me know and the book's all yours).

The one precious book my mother did let me take was Alice Medrich's "Chocolate and the Art of the Low-Fat Desserts". It is the most sublime dessert book. It has recipes that range from easy to very, very difficult and I've worked my way up from chocolate icebox cookies to meringues, to grand marnier cakes, to frozen hazelnut tortes made of multiple mousses (often unsuccessfully, but sometimes with a little bit of air-filled luck). Alice taught me the wonders of pillowy lemon mousse (yes, in a chocolate cookbook), the simplicity of custard, the beauty of genoise, and the wonders of properly made buttermilk loaves (oh, and liquor soaks. God I love liquor soaks). It's such a good book that even though it's out of print, my mother found a used copy online just so I wouldn't have to cart mine home every Christmas and waste valuable suitcase space (traditionally, half the baggage on a St. John's final destination Christmas flight doesn't make it anyway because so many people are going home with some many things for family who they haven't seen in a year that the air carrier just doesn't load about half the baggage because they assume there will be weight problems on the sardine-stuffed plane. The baggage, not just the people).

The point of all this nostalgia is that she (Alice, not my mom) has two recipes that use chestnut purée. Working my way through the book I wanted to make these recipes, especially since she describes it as a simple delicacy, to be enjoyed on its own as a light dessert. In Parisian bistros waiters would serve it to you directly from the can with a little creme fraiche. In fact, the only places I've seen the purée (which can be bought sweetened or unsweetened, or whole in syrup) are in gourmet specialty stores and the only brands for these cans that I've seen are still imported from France.

Turns out that chestnut trees in North America pretty much died out! Chestnut purée was never big here like in France so no one seemed to miss them, but you can still find fresh chestnuts around Thanksgiving, and more often toward Christmas (chestnuts roasting on an open fire and all that, but who has actually roasted a chestnut? Maybe you would have if there had been more trees). They're making a come-back, though. The native North American variety is being combined with the Asian variety for a chestnut resistant to the blight that plagued the N.A.-version. Apparently, in 10-15 years we'll have a genetically modified chestnut that's 15/16th North American and 1/16th Asian. I'm not sure how I feel about the genetic modification...Anyway, look for the Italian or French chestnuts if you can find them, instead of the Asians, says my chestnut source.

The cooking process is time and labour-intensive, so I still recommend buying the relatively expensive purée (though the fresh chestnuts aren't exactly cheap either), unless you're me, of course, or want to experience it once, or...well, you know that home-made is always better.

There are a few methods to making chestnut purée. If you're going to roast them you need to score them with a knife first (an 'X' on the bottom) so they don't explode in the oven. The easier way is to boil them twice to remove the two layers of skin, and it doesn't effect the flavour too much if you're making purée from it.

Vanilla Bean Chestnut Purée
1 kg fresh chestnuts
500g (2 cups approximately) sugar
1 litre (about 4 cups) of water
A vanilla bean (optional, but a VERY, VERY good idea. Or you can add a 1/2 tsp of vanilla extract near the end)
Salt

Put the whole chestnuts in a pan of cold water and bring to a boil. Boil for 3 minutes. (In theory you can now remove the outer layer of skin, but the recipe was ambiguous about this, so I just left it on).

Drain and place them back in the pan with some fresh water, this time with a pinch of salt, and boil them for about 20 minutes. Leave the chestnuts to stand in the water (take the pot off the heat) for an extra 5 minutes.

Remove them from the pan a few at a time (put the lid back on after removing each couple to keep the heat in, since they're harder to remove when they're too cool) and carefully remove the chestnut skins (cut in with a knife to open the chestnuts like a books and scoop out the flesh with a spoon).

Place the chestnuts in a shallow frying pan.

Dissolve the sugar and water in a separate pot over low heat. Add the vanilla bean and allow to simmer while gently stirring until the syrup thickens a little. If you're using extract, allow the syrup to thicken and then add 1/2 tsp extract.

Pour the syrup over the chestnuts and simmer gently on low for about 30 minutes. Turn the heat off and let them steep in the pan for 20 minutes. Place in blender or food processor and purée, or just serve these are half chestnuts in their syrup. I could have puréed the chestnuts after removing them from their skins, but then they'll burn more easily in the frying pan.

Serve with crème fraiche, thick yogurt, or whipped cream (I personally think ice cream is too cold to serve with the chestnuts. The chestnut flavour would be hidden and you definitely wouldn't taste any vanilla. The lighter creme fraiche contrasts the sweetness of the chestnuts (mostly carbohydrates) and lets the vanilla shine through. In theory a vanilla yogurt or ice cream would complement the vanilla of the purée but all that fake vanilla flavouring feels wrong after using a real, luxurious vanilla bean (maybe a home-made yogurt made with the same kind of vanilla bean. If I had an ice cream maker I'd still give it a try, even though I think it would be too cold).

It's the simple things in life...

Tuesday, November 9, 2010

One of the Strangest Things I Ever Made: Dehydrated Butternut Squash

Starts like this:


Turns into this:


Then turns into this:
Weird, huh? Yeah, I thought so too. So you take a butternut squash, peel it, cube it (1-inch cubes), soak the cubes for 8 hours in cold water (or overnight), drain, put them on a baking sheet, and stick it in the oven (or dehydrator. Imagine! What luxury) on the lowest possible temperature with the door open for about 16 hours. Turn the pieces over about halfway. Better yet, put the pieces on a rack so they dry on all sides at once and you can cut the dehydrating time in almost half. 

Of course, I can't follow a recipe for the life of me. So I forgot to soak the squash, which is the whole point; it makes it easier to digest. I then puréed the whole thing for some reason (I guess I figured the liquid would evaporate more easily that way?) and lined a baking sheet with the purée. God was it hard to blend that thing. Took forever. I had to coax my blender into cooperating by promising it something liquid later, such as a juicy smoothie with no ice cubes. I tell you, that thing's a workhorse, though. Wouldn't trade it for anything, not even a VitaMix. (Wouldn't trade it, but would accept a VitaMix as a gift).

Then I stuck it in the oven as per the instructions above. Took forever to dehydrate, more than 16 hours. I added fresh thyme, though, which was a lovely idea for once. You need to stir it in or it'll just dry out and be bland, though. 

Hours and hours later I sort of flipped the stuff over and broke it up a little. It's the inside that doesn't dehydrate well so the more surface area exposed to air the better. I even stuck it back in the blender after about 12 or 16 hours to break it more. It ended up looking like a strange kind of granola and the colour got bright orange, though the flesh had originally been pale. The taste is really interesting! Usually squash is mild and sweet, but this was a lot more pungent. With an acid (vinegar), it would work REALLY well. So I'd use this as a garnish for salad with a vinegar dressing. Kind of like raw croutons. They take a fair bit of chewing, but they're interesting. Originally the recipe from Rawmazing said to wrap it up with sage and some raw nut cream but that didn't sound like a good idea, so I just snacked a little. Just want to say that I'm glad I'm not actually "raw", and experimenting with these things is just fun and not a "life or not-eating" (aka death) thing...

Sunday, November 7, 2010

Extraordinary Eggplant: Indian Bringal


I've gotten into the habit of roasting or even boiling (in a rush) eggplant and then seasoning it with a blend of "hot", "salty", and "sweet" (ex: cayenne + soy sauce + oyster sauce; chili paste + fish sauce + hoisin; red pepper flakes + miso + mirin, or some combination of these which become mostly Chinese, Vietnamese or Japanese dishes), but sometimes a recipe comes from a reputable source and I just have to try it (this is officially an Indian or Bangladeshi dish, similar to bhartha, but with much more nut flavour and, despite the huge quantity, less oil than you'll find in restaurants). There's no added sweetener but the eggplants should be sweet enough on their own, even without taking out their seeds or leeching out their liquid with salt first (eggplant cubes in a colander for 30 minutes is standard, but the extra salt plus the wait time is annoying, says the girl who just spent 5 days making ginger confit...).

This was the best eggplant dish I've ever made, and I've made a lot of eggplant. It's no good the second or third day. It has to be fresh because the sesame flavour dies and then whole thing is kaput. But do it perfectly, and life is beautiful...


Ingredients
4 medium Asian eggplants (1 1/2 pounds - the long, thinner, lighter purple ones)
1/4 cup
1 large onion
1 tsp garlic, minced
1/2 tsp cayenne
1/2 tsp turmeric
1/2 tsp cumin seeds, crushed or coarsely ground (I toasted them first. The recipe doesn't say to do that, but it's standard. It actually made me doubt the recipe that this wasn't required, but no, it was trustworthy. If a person had told me this recipe instead of seeing it printed, though, I would have worn a very quizzical, doubtful face)
2 tsp minced green cayenne chilies, optional
2 tsp shallots, minced, definitely not optional
1/4 cup fresh cilantro

Preheat the oven to 450 Fahrenheit. It's better to char the eggplant over a grill for a smoky flavour, but the sesame oil does a pretty good job adding savouriness on its own, so roasting is fine. If you have a grill in which you can put wood chips to give food a smoky flavour, please invite me over and I will make this recipe for you. We should be friends. I also feel that if you're reading this and we're not already friends we should be friends, with or without eggplant.

Rub the eggplants with a little of the oil and prick them all over with a fork. Roast them in the preheated oven on a baking sheet for 45 minutes. Really you don't even need the baking sheet, you can just put them straight on the bars, but my oven bars don't get cleaned that often and I roast a lot of things that set off the fire alarm and leave some char in my oven, so I went with the baking sheet. Know thyself...

Let the eggplants cool (turn off oven).

Heat the rest of the sesame oil over medium-high heat in a skillet. When hot, add the onion, garlic, cayenne, turmeric and cumin. This is the giveaway on how this is not an authentic Indian recipe. In a real Indian recipe you would probably never add all these things at once. The ground spices especially would probably go in after the onion and garlic had browned, but it worked fine, and there's enough oil to make sure nothing burns, so really it's fine...

Lower the heat to medium and cook for 10 minutes. Do not have a seat and/or a smoke, walk the dog, start a book, etc in this cooking period. Sure, there's lots of oil to make sure the onions don't burn but you have 10 minutes to cut the eggplant in half, scoop out the flesh, and mash it in a bowl with a fork before the dish is ruined. Starting...now!

After the 10 minutes (set the timer, please) add the fresh cayenne chilies to the onion mixture and stir-fry 1 minute. I think I either used red cayennes or none at all. I certainly didn't use greens. You can also skip this if your tongue doesn't like fire. Mine does. There's a reason there are 4 sets of spicy things in my fridge right now: a jar of Sichuan peppercorn pickled chilies, one fermented Sriracha chili paste, one un-fermented chili sauce, and 4 jars of Indian pickled jalapenos. I maybe don't have a great reason for this, but addictions must be fed, and really, in the grand scheme of addictions I figure I'm not doing so badly. I could be my brother...(I really don't think he reads this. Too busy being a successful addict. If he does read this, we'll talk about it when you come visit me. Bring a grill, some wood chips, and some eggplants and we'll make a time of it. What you don't know, other readers, is my brother visits me once every never, so I have nothing to worry about).

We were cooking, weren't we?

Add the eggplant and salt and cook 2-3 more minutes.

When you're ready to serve (ideally right after the 2-3 minutes is up since the dish isn't getting any more delicious by making it wait) add the minced shallots and stir-fry for 1 more minute. The quick fry keeps you from having raw onion breath for the rest of the night, but also keeps them crisp enough that it really is a garnish. Then garnish each serving individually with coriander (roll it up into a tight cigar and slice at 1/2 cm intervals, approximately). You can garnish the whole skillet with the cilantro but then the plate presentation isn't as beautiful. Normally I would say garnish the skillet and eat from the skillet because it's eggplant, but that's a whole lot of sesame oil and I will have no part in encouraging you to over-indulge in something like 36 grams of fat. It's meant to be one dish in a meal of many dishes. Go find yourself some naan or roti...or puri...mmm... (or other bread) and some protein, and some friends to share it with (only because the dish doesn't keep well. Friends are returnable). Oh, and thick yogurt to cool your burning mouth. You don't want it so hot in there that you can't taste the sweetness and nutty sesame flavour, so periodically dousing the flames in your mouth with cooling tangy yogurt is key. I dare you to tell me this is not an amazing dish.